
The level is known as the Shade Perilous: Castle of the Nocturnal Lieutenant Jaciel Morgan. You make a few new friends (if you can call them that), mostly the Dremora and Seducers. You can also get friendly with the Fire and Frost Daedra, though they will still attack you. The real menace on this level comes from the Dark Seducers. They have many spells, hit for large amounts of damage, have high hit points, and there are quite a few of them. To move on, you need to find the Nocturnals Deyanira Katrece and Jaciel Morgen, find the Ekem, Jeb and Quam Sigils of Entry, activate the four levers, touch the Hand of Kindness (optional), find the Book of Wheels, and enter the sacred code a few times. This is by far the longest level yet, so patience is in order.
Quick WalkthroughEdit
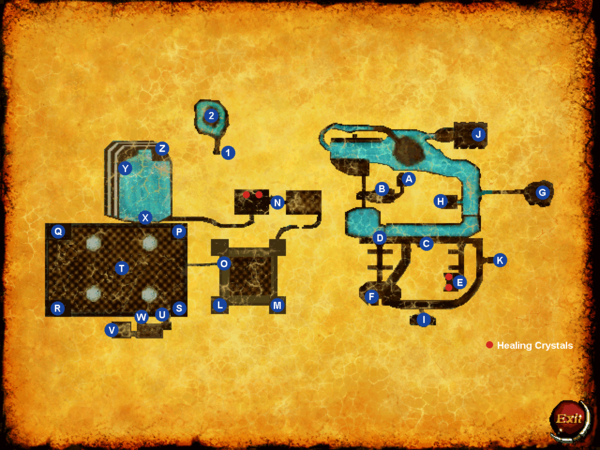
- You start out at Point A on this level.
- Pull the chain at Point C.
- Get the passphrase "The Gerent of Dagon Rules Here" from the Fire Daedra or the scroll in the cage at Point E to open the door near Point F.
- Talk to Deyanira for a while at Point F. Touch the sword on the southeast wall to reveal the lever in the center of the room. Activate this lever and the ones at Points G and J; beware of the group of Seducers and Dark Seducers near Point J.
- Get the Jeb Sigil of Entry from the Fire Daedra at Point G and the Ekem one from another at Point H.
- Go to Point I and talk to the Seducer to get the keyword "dusk" (also found on a scroll in this room). Touch the Hand of Kindness to heal yourself, if needed. Above this stone hand floats the word "dusk" in Daedric sigils.
- Go through the teleporter at Point K to end up at Point L.
- Talk to the Dremora at Point N to get a Quam Sigil of Entry.
- Go to Points P,Q,R,S and press the buttons which spell the word "dusk". A wrong button causes around 40-50 points damage.
- Point P: Letter U is 4th from Left
- Point Q: Letter D is 4th from Left
- Point R: Letter K is 4th from Left
- Point S: Letter S is 1st on Right
- Each correctly pressed button raises a platform to the room's center column.
- Turn the four wheels affixed to the center, Point T.
- Enter the now opened door at Point U by using the password "dusk", find and activate the last lever at Point V.
- Talk to Jaciel at Point X.
- Return and talk to Deyanira at Point F.
- Return and talk to Jaciel at Point X.
- Touch the torch at Point Y to raise a platform.
- Enter energy field at Point Z via the password "djemekweh". Talk to the Dremora and enter the teleporter.
- Enter the well portal at Point 2 to exit and continue on to the Chimera of Desolation.
Detailed WalkthroughEdit
Point A - Entry HallEdit

The gate from the Soul Cairn drops you off here. Your friend left a scroll behind a nearby pillar; things have apparently taken a turn for the worse.
At the far end of the room, a talkative Frost Daedra stands guard. It will not attack unless provoked, and reveals a lot of information if you are savvy. It appears as though either Xivilai Moath or Faydra Shardai is the one in charge around here. Imago Storm leads the Dremora, and is in charge of the invasion force. You also learn that the Frost Daedra aren't too fond of their Fire counterparts. If you agree to kill the Fire Daedra, the Frost Daedra will give you a pair of enchanted greaves.
Point B - AscentEdit

As you enter this room, you find a claymore hanging on the wall to your left and a stash of arrows on your right. Ahead, Fire and Frost Daedra stand guard. If you have not yet made friends with the Frost Daedra, you have another opportunity here.
Speak to the Fire Daedra as well; you may learn that two Nocturnal lieutenants, Jaciel Morgen and Deyanira Katrece were captured and are being held prisoner. The lesser Nocturnal, Deyanira, is in the farthest cell in the southern block. The cell can be only opened by speaking the words "The Gerent of Dagon Rules Here". The greater Nocturnal, Jaciel, is somewhere "beyond the whirling spiral grinders".
As with the Frost Daedra, you may agree to help the Fire Daedra by wiping out the competition. You will receive an enchanted helm as part of the bargain. Striking a bargain with one faction does not prevent you from doing the same with the other.
Point C - Cell Lock PullEdit

In the middle of this long hall is some sort of device with a pull chain. Pulling the chain opens the door to the cells at Point D.
Point D - Cell BlocksEdit

Return to this door after activating the device at Point C and make your way down the passage to Point F. Depending on random enemy placement, you may encounter a Dremora within; speak to him to learn many important things.
First, to rescue your friend, you must pass beyond Shade Perilous and through the Chimera of Desolation to reach Dagon's Pleasure Palace. The exact route is beyond the Dremora's knowledge, although he says that Jaciel Morgen would know the way. The Dremora further states that the Fire and Frost Daedra must be eliminated and order restored here so that Mehrunes Dagon will not be upset, and that it would be wise to play off the rival factions' hatred of each other (it is not necessary to destroy them all to move on, however).
Point E - Guard ChamberEdit


At the entrance to this block of cells, you encounter an angry Seducer. If you have learned the names of Jaciel and Deyanira, you can convince her you're on the same side. The room at the end is occupied by a Fire Daedra and a Frost Daedra. Kill them both; if you befriended the Seducer, she may be able to draw their attention as well.
Take a look around the room and you will find several potions as well as a pair of healing crystals. A battered cage takes up one corner, containing a dead battlemage. Closer inspection reveals the final note from your friend. It mentions a password, "The Gerent of Dagon Rules Here". This is the same password you can learn from speaking to a Fire Daedra, but the scroll gives no clue on how or where to use it.
Point F - Large CellEdit


Head south from Point D to find another door. Attempt to open it and find it requires a passphrase. The correct phrase is the same one learned from a talkative Fire Daedra or by reading the scroll at Point E ("The Gerent of Dagon Rules Here").
Enter the cell and talk to the prisoner, Deyanira Katrece. She asks you to free her mistress, Jaciel Morgen, from her imprisonment behind the Night Portal Point W and self-imposed retreat into the Dreamsleeve. To do so, you must get the Nocturnal mana streams flowing again by restarting the magica tourbillions. They will not turn until the Wheels of Heaven are given the appropriate code. Deyanira doesn't know the code, but tells you that answers can be found in the Book of the Wheels of Heaven. She also mentions something about solving the "riddle of the stools", but doesn't elaborate further.
To open the Night Portal, you must pull four hidden levers; one is near a podium, another in a secret underwater grotto, another under a table, and the last in a storage room. The lever beneath a table is in the center of this room, and made accessible by touching the large sword affixed to the south wall. Once the sword is activated, the table splits open allowing access to the lever. Pull it.
The WaterwayEdit


After riding the elevator up from Point B, take the north hallway. This leads to a large room that may have some enemies within. Take care of them and head down the ramp along the south wall. The path leads to a large waterway and ends at a dock, where a small boat is moored. Head east along the water to reach Points G and H.
To reach Point J, jump in the water near the boat. Head below the surface and look for a cavern in the west wall. Follow it as it bends around and upwards, grabbing any potions you can find along the way.
If you speak to the Seducers, you may learn that a boat full of Frost Daedra and their loot was attacked by jealous Fire Daedra. Several items can still be found scattered about the bottom of the pools, including a cuirass of Saintly Dervish, a helmet of Profane Vitality, a pauldron of the Fire Heart, a gauntlet of the Frost Heart, and a duplicate note from your companion.
Point G - East Grotto RoomEdit

This is the underwater grotto Deyanira told you about at Point F. There is a Night Portal lever in the floor here, guarded by a Fire Daedra. Kill the creature and take the Jeb Sigil of Entry from its remains.
Point H - Grotto LodgeEdit

The Fire Daedra in this room carries an Ekem Sigil of Entry, take it from him. Some useful potions can be found on the table nearby.
Point I - Passage and Hand of KindnessEdit

This room is protected by a Jeb Sigil of Warding. Pass through using the Sigil of Entry you found at Point G. The Seducer in this room directs you to the Book of the Wheels of Heaven, which can be found in this room (beneath the Hand of Kindness) and in the Mortal Sciences Chamber. The Seducer knows nothing of the riddle of the stools, however.
The dominant feature in the room is an alcove containing a large, outstretched stone hand, the Hand of Kindness. Read the scroll below the Hand to learn a sacred code—"DUSK". Above the Hand floats the word "DUSK" written in Daedric sigils. This shows you exactly which letters you must use at the Points P, Q, R and S. The Hand of Kindness has no readily apparent function, but when activated it disappears and restores your health and spell points. Like the blue crystals, it reappears after a minute ready for another use.
There is also a Coffer of Restoration against the east wall. Be sure to take advantage of its powers before exiting the level.
Point J - Chapel of MeditationsEdit


After exiting the watery cavern, you come to the top of an island thrust high above the water. A group of Seducers is engaged in battle with a pack of Dark Seducers. While you may be able to turn the Seducers friendly by speaking to them, both groups will attack with powerful spells upon spotting you, so be on your guard. Look for a bridge leading east from the island and cross it.
On the other side is a room with large stone doors. Beware of more battling Seducers here, but also be aware that the Dark Seducer here can be spoken to, and even befriended (see bugs).
Open the doors and pass through into a chamber with an altar at the far end and numerous potions lining the walls. Most of these potions are useful, but some are deadly poison. Destroy any enemies within and look behind the altar to find a Night Portal lever (the one "near a podium"). Flip it.
Point K - TeleportEdit

The teleportation device in this room is warded by Ekem Sigils, forbidding entry unless you have obtained the corresponding Sigil of Entry from Point H. Step onto the teleporter pad to be taken to Point L, and the second part of Shade Perilous.
Point LEdit

Destination from teleporter pad at Point K.
Point MEdit

This teleporter pad returns you near to Point K.
Point N - Dead End PassageEdit


Take the northeast passage out of the room and follow the corridor. It opens into a large room split by a trench. A Dremora lurks here; if you have not yet encountered one, you can learn much from conversation. A Frost Daedra can be found in the northeast corner, standing over the remains (and remaining armor of) of a dead adventurer.
Kill both Daedra and loot the adventurer's corpse, then head west down a long hallway. At the end, you meet a mysterious, but helpful Dremora. Approach him and he speaks; apparently he has been waiting for you. This Dremora hands you a Quam Sigil of Entry, but teleports away without any further explanation.
Point OEdit

This hall is blocked by a Quam warding sigil which you pass using the entry sigil acquired at Point N.
The Wheels of HeavenEdit


The hall ends in a large chamber dominated by a large column in the center. In each quadrant lies a stone hexagon; these are the Magica Tourbillions, and they must be reactivated to pass through the room. This is accomplished by turning the Wheels of Heaven (the handwheels) at Point T. However, you must first ascend to the second level, then enter the code from Point I by visiting each corner to raise the walkways and access the wheels.
A passageway in the north wall leads to the Mortal Sciences Chamber. Here, you can find some useful potions and another pair of healing crystals, as well as another copy of the Book of the Wheels of Heaven if you need a reminder for the code.
Point PEdit

There are 5 Daedric letters on the wall here, from left to right: Z, W, V, U, T as well as a Coffer of Restoration. Press the letter U for the code word "DUSK".
Point QEdit

There are 7 Daedric letters on the wall, from left to right: A, B, C, D, E, F, G. Press the letter D for the code word "DUSK".
Point REdit

There are 5 Daedric letters on the wall, from left to right: H, I, J, K, L. Press the letter K for the code word "DUSK".
Point SEdit

There are 7 Daedric letters on the wall, from left to right: M, N, O, P, Q, R, S. Press the letter S for the code word "DUSK".
Point T - Tourbillion RoomEdit


Pressing the all the letters to spell dusk at the Point P, Q, R, and S raises four platforms towards the center. You can now turn the four Wheels of Heaven to restore the flow of Nocturnal mana and open the barrier at Point U.
Point U - Back PassageEdit


After pressing the appropriate letters and turning the Wheels at Point T, this previously blocked entrance turns into some sort of energy field. Upon approach, you find it is sealed with a riddle:
- Never watched by daylight
- Never watched by night
- But evenstar watches oft and well
- 'Tween the black and bright
The answer is "dusk" once again (alternatively "sunset"). Enter the room beyond to find some healing potions.
Point V - StorageEdit

The fourth and final lever is found in the northwest corner of this room. Flip it.
Point WEdit


This passage remains barred until the four levers at Points F, G, J, and V have all been activated.
Point X - Night PortalEdit


At the end of this tunnel you find Jaciel Morgen. The Nocturnal lieutenant is in a state of deep melancholy, but if you say the right thing you will get her attention. Unfortunately, she is in such as state of depression that she is unable to give you any useful assistance.
Return to Point F and speak to Deyanira Katrece once again, in hopes that she will be able to help. She is thrilled that you found Jaciel, but says that only a deeper loss than even that of losing Shade Perilous will revive her. Deyanira then suggests that she sacrifice herself, offering to be thrown into Oblivion. You reluctantly agree, and must perform the required ceremony.
Once the deed is done, return and speak to Jaciel at Point X and tell her about Deyanira's sacrifice. She becomes very enraged and you fear for your life, but once you calm her down, she understands, and tells you how to move to the next level. You need to cross the Rock Sails to a lesser portal which opens by the word "djemekweh". Beyond the gate lies a lesser portal, and beyond the portal a second gate, which will send you to wherever Dagon's forces have set it to go.
Point Y - Rock SailsEdit

Carefully make your way across these partial bridges over a yawning abyss. This flaming blue torch in the northwest corner turns out to be a switch, which raises a platform allowing passage to the lesser portal at Point Z. There is a bug regarding one of the bridges that may soft lock progression of the game [see Bugs].
Point ZEdit

You find the gate Jaciel mentioned, a large blue-white glowing energy field. Activate it and see,
- The Gate is Sealed
Say the word "djemekweh" and the energy field vanishes. Beyond is a short hallway in which lurks a Dremora. He will engage you in conversation as you approach, providing much useful information. Unfortunately, your friend has been captured by Lord Dagon and taken to his hunting lodge. Also, much to your distress, on the next level, Chimera of Desolation, you will be hunted as prey in a game. There are rules to this hunt and the Dremora suggests you use them to your advantage. You should also seek hidden resources and something that was a man with the mantle of distinction. He does not provide any more detail on these subjects, and you're left with more questions that you started with. The teleporter pad here takes you to Point 1.
If there are friendly Daedra in the vicinity when you open the gate, they may attack and possibly kill the Dremora before he has a chance to speak to you. It is recommended you proceed down the corridor as fas as possible to hear what he has to say.
Point 1 - AtriumEdit

This is the destination of the teleporter at Point Z. The Hex Room and its Gate lie beyond the partially flooded corridor.
Point 2 - Hex Room and Gate PortalEdit

You enter the Gate here, moving on to Level 5, the Chimera of Desolation.
EnemiesEdit
- 18x Dark Seducer
- 13x Dremora
- 18x Fire Daedra
- 16x Frost Daedra
- 25x Seducer
BugsEdit

- Jaciel may not recognize the fact that you've performed the ritual on Deyanira. It is still possible to pass the gate with "djemekweh".
- It is entirely possible to skip the Jaciel-Deyanira subplot. The game remains winnable, despite mentioning Jaciel later.
- The Dark Seducer outside Point J may be willing to converse with you, and utilizes an alternate dialogue meant for Seducers. ?
- It is possible to clip out of bounds by pushing against the wall in the water in the room with water near Point D.
- After activating the torch at point Y, the platform will raise. There is an additional bridge leading to point Z that does not appear until you jump onto the platform right before it. Leaving this platform (or leaving and jumping back to the platform) may cause the bridge to disappear, making it difficult to reach the lesser portal, which is necessary to progress the game. It is recommended to avoid activating the bridge until you are ready to finish the level. It is possible to jump the gap with high enough jumping skill paired with jumping potions and enchantments, as well as the Cuirass of Saintly Dervish. ?
.png)