|

Quick WalkthroughEdit
- Enter the Catacombs and open the locked door using the gold key.
- Travel north to D. Step on a button to reach E, pull the lever there, and pick up the fist rune.
- Light the torch on the walkway in C. Go through the revealed passage and insert the rune into a notch.
- Continue on to G. Use the stairs and ropes to reach the lever overlooking H, and pull it to raise another bridge.
- Solve the weights puzzle at J and pick up the silver key. Use it to unlock the door going north from I.
- At L, press the button to make the rings turn, then descend through holes between levels and tunnels in the wall to the bottom, pulling a lever on the third ring to open the final tunnel.
- Proceed to M, where you'll meet Nafaalilargus, who is guarding the soul gem. Kill him, grab the soul gem, and exit via the large doors to the north.
Detailed WalkthroughEdit
- Point A — Locked Door
- Since you've already been to the Catacombs, the entrance east of the docks is unlocked. Proceed down the tunnel and over the lava blocking your way to find the door you couldn't open before. Use the gold key on the lock left of the door to open it.
- Point B — Hall of Warriors

- This large room features two pillars and a great staircase leading up to C. Three elite guards patrol the bottom level and another one walks up and down the stairs. There is a mid-level walkway on the north and east walls, forming an archway underneath, but you can ignore this for now and head up the stairs. If you didn't bring a torch, be sure to pick up one in this hall: on the ground to the right as you enter or under the arch north of the pillars.
- Point C — Two Buttons

- Kill the two elite guards in the hallway past the stairs. The next room has a lowered floor with two buttons that temporarily raise a bridge between the north and south hallways. The north hallway is too high to climb. To get up there, run over one of the buttons and jump to grab onto the bridge as it rises. Before it comes back down, turn north and through the hallway. Most likely you'll have to make a second jump to get through in time.
- Point D — Fist Rune

- This room has a lava well with a pillar coming out of it. Pull the lever on the southeast wall to simultaneously lower the pillar and open the door in the north. Grab the fist rune and return to B.
- Point E — Rope to Walkway
- At the top of the stairs again in B, you have two options. You can simply drop down from the stairs to the walkway or use the rope at E. If you choose the long way, go down the stairs and through the northeast hallway hidden under the arches. You will have to deal with an elite guard here and another on the floor above.
- Point B — Opening the Rune Door
- The western end of the walkway is blocked, but you can reveal a passage by lighting the unlit torch on the wall with one of your own. Insert the fist rune into the notch with a fist symbol to open the door in the southeast with the same symbol. Continue on to F.
- Point F — Blade Traps
- Opening the rune door allows another guard into the Hall of Warriors. The long hallway through the door has several blade traps which kill you if they hit at a certain angle. They are timed in such a way, however, that you can run forward and be safe.
- Point G — Stairs and Ropes
- Two elite guards patrol the stairs in this area. You can either go down the center ones to H or up one of the side stairs to an upper level. If you want some potions, go to H first because they will be inaccessible later. On the upper level, climb the rope either in the north or south end to reach a hallway above. Roughly halfway between is a tunnel leading east to a platform overlooking H. Pull the lever to raise a bridge to the next area.
- Point H — High Tunnel

- If you came here before pulling the lever, you can find two health potions, a strength potion, and a gold pouch in the alcove underneath the higher tunnel. If you already pulled it, you can go back and lower the bridge temporarily.
- Two more elite guards patrol this room, which is very tall with two large pillars. Once the bridge is raised from the lever on the high platform, you can cross over it to the tunnel going to I.
- Point I — Lava Chamber
- You will encounter four more elite guards in and along the way to this chamber with two lava rivers. It contains four pillars, one of which has fallen for easy access to J. You can also find a health potion across the east river. The door north is locked; only the silver key you obtain in the mechanical room can open it.
- Point J — Mechanical Room

- Carefully jump over the four lava pits in the passage ascending to this room. There is some sort of mechanism on your left moving weights in various directions. Pick up the three iron weights on the ground. Most of the pressure pads in the hallway going north cause blades to sweep out and kill you. The two pads on the edge are safe, and dropping a weight on any other pad will make it and the pads adjacent to it safe. The goal is to drop weights on the three pads marked with the symbol that also appears on the door. This opens the door, behind which you'll find the silver key mentioned earlier.
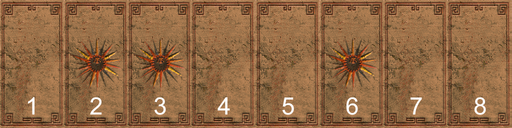
- This is a possible solution:
- The diagram below numbers the eight pads, with 1 being the closest. You do not need to jump over the pads for this solution, although this is possible to do if you mess up. When the weights are on pads 2, 3, and 6, you can walk on all the pads safely.
- Weight on pad 1
- Weight on pad 2
- Weight on pad 3
- Pick up weight on pad 1
- Weight on pad 4
- Pick up weight on pad 2
- Weight on pad 5
- Pick up weight on pad 4
- Weight on pad 6
- Pick up weight on pad 5
- Weight on pad 2

- Point K — More Blade Traps
- Use the silver key to open the door in I. The hallway from there to L contains more blade traps, but again you can run forward and not get hit.
- Point L — Coliseum of Revolution

- You come to a large circular chamber with three levels of rings. Push the panel on the podium and the rings will begin to turn. The first and topmost ring has a hole in its ceiling that you can drop through. Each ring has a number of blade traps, some moving with it on the inner wall and others that stay still on the outer wall. To descend to the second ring, look for a tunnel in the outer wall, making sure to dodge the blades.
- Wait at the bottom of the tunnel for a pair of walls without a floor between them to come by. Keep up with their pace while avoiding any blades and you will eventually fall through a hole in the floor to the third ring. Down there, look for an alcove in the outer wall with a lever. Pull the lever to open a door about 90 degrees clockwise around the ring. Beyond the door is a very steep tunnel descending to the bottom of the coliseum. Exit via the passage to the northwest.
- Point M — Nafaalilargus

- Run down the long passageway; as you approach the white stone door, it automatically opens. You notice the dragon, Nafaalilargus, above and behind you. Cyrus has a short conversation with him, but the dragon won't give up the soul gem so you'll have to kill him.
- Your attacks only work if you heat your blade in the brazier that the dragon lit earlier. This is an ideal time to use strength and ironskin potions because his attacks do 20 damage and the heated blade quickly cools. Try to stay close where he can't bite or breathe fire, and more importantly, stay close to the brazier. When the dragon is dead, climb up the stairs where he was sitting initially and take the soul gem. Activate one of the many piles of gold in the Treasure Vaults to fill your inventory to the limit, 500. Leave through the large doors to the north. Note that you can't leave until you pick up the soul gem.
- As you leave, the scene Dragon is Dead plays. Lord Richton has been informed of your latest feat and Dram is planning an attack on the League hideout. You emerge from the vaults outside some large doors north of the Palace. A shrine of Kynareth is nearby for fast travel, however, an elite and four veteran guards protect this exit.
NotesEdit
- You can return to the Treasure Vaults at any time after this to fill your gold to 500. This can be helpful for stocking up on potions and buying any remaining items you want from Gerrick's Goods and J'ffer's Books.
- When Cyrus stands on the doors, he comments, "Hmm. Those knockers are really something."
- The names Hall of Warriors and Coliseum of Revolution come from The Redguard Companion.
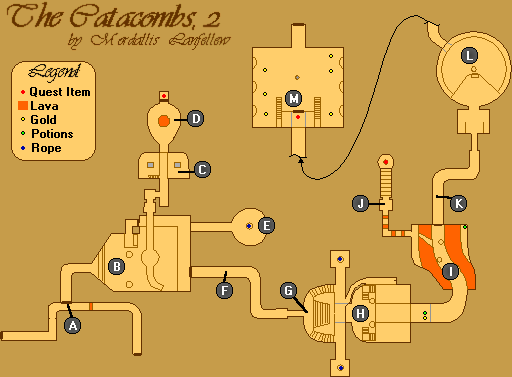
MapEdit

ScenesEdit
Conversation with NafaalilargusEdit


Cyrus walks into the Treasure Vaults toward a brazier.
- Nafaalilargus: "Grrrrrrr --"
- Cyrus: "What's this?"
The door closes.
- Nafaalilargus: "Rrrrrooooaaarrrr"
- "A little privacy."
- (Breathes fire)
- "Rrroooorrrrrr"
- "A little candlelight.
- "And the pleasantries begin. My name is Nafaalilargus."
- Cyrus: "So you're Richton's pet, then?"
- Nafaalilargus: "You wound me. Richton's pet is that dark little thing with the poisoned splinters.
- "I am Tiber Septim's proud soldier, loyal vassal, a jewel of the crown. It's not my fault I have to keep company with the Governor."
- Cyrus: "You have something I need, dragon."
There is a closeup of the soul gem near the dragon's feet.
- Nafaalilargus: "I shan't lie to you, good stranger, my Imperial loyalty is indeed well paid for. We aren't very different, I would venture.
- "You seem the mercenary sort, too. So you'll understand --
- "-- if I do not readily agree to part with my latest reward."
- (Lights brazer on fire)
- "Rrroooorrrrrr"
Cyrus draws his sabre.
- Cyrus: "Maybe we can bargain for it."
- Nafaalilargus: "I so do love mortal fantasy. I'll play along: what will you give me for the soul of Prince A'tor?"
- Cyrus: "I'll spell your name right on your tombstone."
The dragon attacks.
Dragon is DeadEdit

The scene is set in the large chamber of the Palace.
- Richton: "Dead."
- Guard: "Aye, milord. The dragon is dead."
- Richton: "And he's alive."
- Guard: "We are not sure it was the Redguard, milord --"
- Richton: "Don't be stupid. That bastard sweats heroism. It could be no one else."
- Dram: "He has the soulgem."
- Richton: "Why do I pay you exactly, Dram?"
- Dram: "For my chilling countenance, of course."
- Richton: "Leave him to me, you said, and with such confident assurance.
- "I recall being set at ease about the matter. I recall thinking: well, now, at last I can get down to the task of administering this troubled province --
- "But this young man continues to cause us irreparable harm when we can least endure it."
- Dram: "And now for the good news. Perhaps you remember the vicious group of rabble that's caused us so much trouble."
- Richton: "The Restless League!"
- Dram: "Whose hideout would have remained a mystery if a prematurely dead Redguard had never led me to it.
- "It will take time to assemble an assault party, but I foresee no difficulties in cleaning out the whole League in one well-planned attack."
- Richton: "I see. The Emperor warned me never to underestimate the subtlety of your schemes, Dram. Carry on, then. I await your full report."
| Prev: Rescue Iszara | Up: Quests | Next: Raze the Palace |