
This level is known as the Havok Wellhead, which is where you will find the neonymic for Dagon which will hopefully help defeat him. It is a relatively simple level, although the Daedra Lords are powerful foes. There are also many weaker Clannfear and Herne Oathkin wandering around. To exit, you must find the Iya, Payem, and Tayem Sigils of Entry and three gatekeys. The sigils can be found on a number of mobs, not just the ones listed here.
Quick WalkthroughEdit
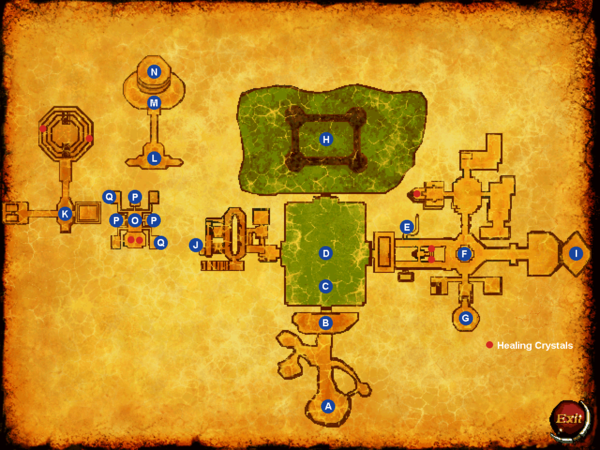
- You start at Point A.
- Push over the nearest 'log' to the door at Point B to open it.
- Kill one of the Daedra Lords near Points C or H to get an Iya Sigil of Entry.
- Push the two buttons on the platform at Point D.
- Kill a Clannfear at Point F to get a Tayem Sigil of Entry.
- Go to Point H and talk to Lord Imago. Get the three neonymics and a gatekey.
- Talk to Xivilai Moath at Point I. Threaten him with banishment to get a gatekey.
- Enter the western mirror at Point J to teleport to Point K. Kill the mobs around to get Cess and Payem Sigils of Entry.
- Enter the southern mirror at Point J to teleport to Point L. Talk to Faydra Shardai at Point N, then banish her or make a deal for the last gatekey.
- Return to Point H and insert the three keys into the green lantern to activate the gate. Enter to move on to Level 7, Dagon's Hunting Lodge.
Detailed WalkthroughEdit
Point AEdit

This is the arrival point from the Chimera of Desolation. You are greeted by several Hernes and Seducers. Fight your way north, but be sure to grab the potions behind the rock to the west. Additionally, search the side passages for discarded gear.
Point B - Entry GateEdit


There is a large gate here, which can't be opened by normal means. However, if you knock over a nearby tree trunk it will crash into the door and open it. Beware, the daedra on the opposite side won't be too pleased at your intrusion.
Point C - CourtyardEdit


This central square house a large Daedric military camp, and is linked to the domains of Dagon's lieutenants. Numerous potions and items are found scattered about. Among the foes encamped here are Daedra Lords, Seducers, Hernes, and Clannfears.
A few the Daedra Lords here (or near Points H or J) are Lesser Lords. Each one carries an Iya Sigil of Entry.
Point D - Courtyard PlatformEdit


Ride the lift up to the platform in the middle of the square to find two buttons. Press each to open the gates leading east and west.
The gate to the north doesn't have any visible opening mechanism. To gain entry, use the largest of three drums standing outside a nearby tent. Watch out for another improbably tough Scamp nearby.
Point E - Secret TunnelEdit

A pair of hallways leads deeper into Xivilai Moath's domain. Each hallway contains a secret door, each leading to stashes of weapons and armor. Partway down, the hallways are connected by a smaller passage, which contains a small room barred by Tayem Sigils of Warding. In this room are a pair of healing crystals and some potions, as well as Volume VII of the Codex Arcana.
Point F - Gathering HallEdit

A Clannfear here carries a Tayem Sigil of Entry. Take it from him. Doors from this area lead north and south, and a passage leads east to Point I, Xivilai Moath's throne room.
The north door leads into a barracks area crawling with Clannfears, Hernes, Seducers, Dark Seducers, and a Daedra Lord. The elevator in the northernmost room leads to two floors of barracks. If you'd like to utilize this elevator, do not step off until you've reached the top floor; it will not descend by calling it from below (not even with patch 1.5). There are many potions, weapons, and armor pieces laying about for the taking, should you require them. A scroll of The Restricted List of Noble Artifacts can be found on a bed on the top floor. The east room is a mess hall containing some potions and a copy of A Short History of The Augmented Craftworks. A healing crystal and some potions can be found in the west room. In Team vs Team, another gatekey can be found near the healing crystal.
Point G - ObservatoryEdit


The red door leading south from Point F opens into an area with three chambers, and is guarded by more Seducers and Clannfears. The western room contains a Coffer of Restoration and Volume VIII of Codex Arcana. To the east you can find what appears to be spare parts for an orrery and Volume IX of Codex Arcana.
The southernmost room is sealed with Tayem Sigils of Warding, but beyond the wards waits the mortal wizard and traitor Sirran Angada. Speak to him, and choose to spare his life or execute him. Ride the lift up to the top catwalk to find some potions and a copy of Starkhorn's Compendium of His Arts and Crafts in the Realms of Lesser Enchantments.
Point H - Imago's KeepEdit


This small castle is the demense of Grand Vizier Imago Storm. Behind the castle is another extremely tough Scamp, along with more Clannfears, Seducers, Daedra Lords, and Dark Seducers. Sneak behind the gate (click behind it) or open it by pushing the switch on the left side to enter. However, be aware that entering the castle without pressing the switch to lower the gate will cause you to become stuck behind the gate when trying to leave, requiring you to load a previous save. Enter the elevator to the west using the Iya Sigil of Entry. If you miss it, you can call it down again using a nearby button on the first or second floors. Note that the second floor can be reached by taking one of the other three elevators in the room, and that there are no warding sigils on the main elevator on this level.
Lord Imago awaits your arrival on the third floor. Speak to him and he will offer you three gifts: the neonymics of Xivilai Moath and Faydra Shardai...and Mehrunes Dagon. Those who know a Daedra's neonymic can use it to banish them to Oblivion for some time. You will also find a large lantern in Imago's throne room. Three gatekeys are needed to activate it, which will open the gate to the next level. Imago hands over one key, and reveals that the other two belong to Xivilai and Faydra. Be warned, there doesn't seem to be any elevator button on the third floor, so if you trigger it to go down by mistake, you're stuck.
Point I - Xivilai's Throne ChamberEdit


Lord Xivilai Moath, Chief of the Fire Daedra and Clannfear clans, is found here. Threaten him with his neonymic and he will yield not only his gatekey, but immunity from his clan.
Point J - LadyGatesEdit

The three mirrors in this room act as teleportals to navigate Faydra's domains. Enter the south mirror to reach Point L, west to get to Point K, and north to Point O.
Point K - Practice GroundsEdit


The arrival point from the western mirror at Point J. Upon arrival, you are met by a host of Hernes, Seducers, and Clannfears. If you have not yet found the Cess or Payem Sigils of Entry, a Herne and Clannfear here each carry one. Exploring this area is optional, and you may return to Point J through the mirror. The eastern room contains an open courtyard, and a watery pit in the western room holds some discarded gear.
The hallway north leads to a large arena; a Herne and a Clannfear are about to square off in front of a large crowd of their respective compatriots, with a Seducer acting as a referee. If you speak to members of the crowd or to the pugilists, you may be asked to join the fight; the Clannfear carries a War Axe of Profane Vitality, and the Herne a Dagger of the Potent Heart. Return with the weapon to gain the trust of the Daedra, or kill them both and keep the weapons. A pair of healing crystals can be found in the stands, on opposite sides of the top level.
Point L - Throne ChamberEdit

The arrival point from the southern mirror at Point J. Use the mirror here to return.
Point M - FoyerEdit

A Payem warding sigil blocks the way here, and several Hernes will pour into the hallway from beyond the wards. Defeat them and pass through using the entry sigil acquired at Point K.
Point N - Queen's ChamberEdit


This is the throne room of Lady Faydra Shardai, Chief of the Fire Daedra and Herne clans. Choose your words carefully and strike a bargain with her, or simply banish her to Oblivion and take her gatekey. Search the room to find assorted potions and gear laying about.
Point O - Booty & BarracksEdit

Exploring this area is optional, but it contains some useful items. Use the northern mirror at Point J to teleport into the room, then take care of the Herne and Clannfear guards. Make sure to search their remains for Cess and Payem Sigils of Entry if you haven't already acquired these. There are eight exits from this room, one in each of the cardinal directions and corners. However, the room to the south is inaccessible at the moment.
Point P - Trap Door PitEdit

The passages to the north, east, and west lead to identical small rooms, each with a sign reading "Intelligence Training" and a trap door that opens if you step upon it, and leads down to a deep pit filled with water. Falling in without having already set a teleport anchor will lead to a watery grave, which you can learn from a mocking sign at the bottom. If you have, there are a few discarded items at the bottom to peruse.
Point Q - Barracks (Wheel)Edit


These two rooms, guarded by Cess Sigils of Warding, can be entered using the entry sigil found at Points K or O. Turn the handwheels on the floor of each room to lower the floating stones at Point O and unseal the room to the south. Here you will find a pair of healing crystals, a Coffer of Restoration, and a good stash of magical items.
Moving OnEdit

Return to Imago's throne room with the three gatekeys, then insert them into the green lantern to activate the gate. Enter the gate and travel to Level 7, Dagon's Hunting Lodge.
EnemiesEdit
- 51x Clannfear
- 7x Daedra Lord
- 5x Dark Seducer
- 49x Herne
- 2x Scamp (with about 10,000 health points)
- 29x Seducer
NotesEdit
- Dialogue options exist within the game that would allow you to banish Xivilai Moath by invoking his neonymic. However, due to an error in the dialogue file that branch of dialogue is never made available.
BugsEdit
- The elevator in the barracks hall north of Point F cannot be called from below.
- The cuirass on the ground in the treasure room at Point O is not retrievable.
- If you speak to one of the caged Clannfears in Faydra's throne room, the dialogue presented is for a Herne. However, the Clannfear's character still appears on the dialogue screen.
- If you speak to the Daedra Lord who emerges from the opened doorway at Point B, he is identified as a Daedra Count, and uses that creature's dialogue from the final level.
- The entrance to Imago Storm's castle is on its south side, but the interior exit is through a door in the north wall.
- Walking on the slanted walls of the lifts at Point H as the lift ascends will cause the player to clip through the lift and fall to the ground. ?
.png)