|
|||
|---|---|---|---|
| # of Zones | 1 | ||
| Clearable | Yes | ||
| Dungeon | Yes | ||
| Respawn Time | Never (storage is safe) | ||
| Level | Min: 40 | ||
| Occupants | |||
| Haknir Death-Brand, Garuk Windrime, Thalin Ebonhand, Haknir's Crew | |||
| Important Treasure | |||
| Bloodscythe Soulrender |
|||
| Console Location Code(s) | |||
| DLC2GyldenhulBarrowExterior01, DLC2GyldenhulBarrow01 | |||
| Region | |||
| Solstheim | |||
| Location | |||
| East of Skaal Village On Horker Island |
|||
| Special Features | |||
| # of Stalhrim Deposits | 2 | ||
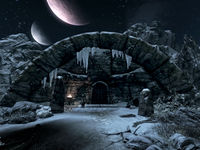
Gyldenhul Barrow is a small Nordic ruin east of Skaal Village containing the spirit and treasure of Haknir Death-Brand. It contains only one zone, Gyldenhul Barrow.
The ruin only becomes accessible near the end of the quest Deathbrand.
Related QuestsEdit
- Deathbrand: Find the treasure of Haknir Death-Brand.
WalkthroughEdit
ExteriorEdit
The entrance is on the northwestern shore of Horker Island. Two small rowboats are drawn up on the nearby beach, and two leveled reavers guarding the entrance will attack on sight. There are four spiky grass plants on the shore, a snowberry bush and a quicksilver ore vein to the left of the entrance, and several standing stones around the entrance. The entrance is through an iron door requiring the Gyldenhul Barrow key, which is found upon collecting the fourth piece of the Deathbrand armor treasure.
Gyldenhul BarrowEdit
Upon entering, you will be in a small catacomb area. A dead adventurer is sitting against a wall in front of you. A pickaxe is beside him, and he is carrying a torn note. Two upright sarcophagi to the east and west contain stalhrim deposits, as does an upright sarcophagus in front of you with a dead draugr spilling out (although this small northern deposit cannot be mined). After you mine the stalhrim to the west, pass through the now unblocked sarcophagus to enter a wide corridor with stairs descending on your left to a key-locked iron door. The same key that opened the outside door opens this one.
Through the door is a wide corridor leading to another locked iron door that uses the same key. The corridor is full of treasure, some of which is trapped, causing a gate to drop behind you and sealing you in when you take it, and forcing you to explore further into the barrow to escape. At the far end on the left is a master-locked chest, and at the near end on the right is an expert-locked chest with two burial urns beside it. In the middle of the corridor is a large urn. Found in the corridor are a quiver of arrows, a bow, a war axe, a mace, a greatsword, a battleaxe, a pair of gauntlets/bracers, a shield, a set of armor, a pair of boots, a helmet, a healing potion, a magicka potion, four additional potions, an empty soul gem, and a filled soul gem, all of which are random and set the first time you enter the barrow even if you didn't mine the stalhrim deposit. In addition, there is a potion of ultimate healing, a potion of ultimate magicka, three bowls, four cups, a diamond, two emeralds, a garnet, seven goblets, two plates, a ruby, an amethyst (this is almost under the front of the master-locked chest and can be easily missed), and 6400-9600 coins. Both chests are opened with the same key used for the doors. The only way you can go is forward through the second iron door.
Upon opening the second door, you find yourself at the top of several flights of stairs leading down to the southeast. At the bottom of the stairs is a doorway into a huge room, featuring arches on either side and tall pillars rising to a suspended ceiling. Ahead is a wide flight of stairs leading up to the south-southeast. At the top is an altar upon which the skeleton of Haknir Death-Brand is laid out. Beside him is Bloodscythe, a unique scimitar. Upon taking the weapon, the whole barrow will shake, and Haknir's ghost will rise behind you, down on the main floor of the room. In addition to fighting his ghost, you also must face the ghosts of his quartermaster Garuk Windrime, his helmsman Thalin Ebonhand, and the ghosts of his former crew, making this quite a long and potentially difficult fight.
Once they are all vanquished, you will complete the quest Deathbrand, and can loot his skeleton for some gold and Bloodscythe's bladed companion, the unique scimitar Soulrender. There are short flights of ascending stairs on either side of the altar, one to the northwest with a large urn at the top, and the other to the southeast leading to the boss chest.
NotesEdit
BugsEdit
- Gyldenhul Barrow's entrance door is locked by a master-level lock and technically requires the Gyldenhul Barrow key to open. However, this can be circumvented by attempting to pick the lock while having the Wax Key perk, which gives you a copy of the required key. Entering through this method and proceeding to fight Haknir will break the quest and may cause it to remain permanently in your quest log, as the correct quest stages are skipped.
- The Unofficial Dragonborn Patch, version 1.0.3, addresses this issue. (details) The entrance door is now marked as requiring the key, such that you can't attempt to lockpick it and thus can't receive a duplicate key.
