|
||
|---|---|---|
| Added by | Tamriel Rebuilt | |
| # of Zones | 4 | |
| Daedra Lord | Mehrunes Dagon | |
| Occupants | ||
| Worshippers, Daedra | ||
| Console Location Code(s) | ||
| Yashazmus Yashazmus, Outer Halls Yashazmus, Shrine Yashazmus, Flooded Halls Yashazmus, Pit of Sacrifice |
||
| Region | ||
| Telvanni Isles, [39,18] | ||

Yashazmus is a large daedric ruin to the west of Port Telvannis, dedicated to Mehrunes Dagon.
To reach Yashazmus, take the road which leaves Port Telvanni from the northwest. This road eventually cuts straight through the middle of the ruin, so it is impossible to miss. On the surface, Yashazmus is covered in a mass of rogue Telvanni roots, which have caused significant structural damage to the shrine's many towers. There are two entrances into the shrine, one which requires levitation or skillful jumping to access at the top of the southern tower, and one which is much easier to access by the road. The surface of the ruin is guarded by four random daedra.
Outer HallsEdit
This is the first section you will enter. The halls contain one Scamp, one Clannfear, and two Dremora, one of which is a Dremora Lord. If you entered from the southern tower, you will find yourself at the top of a ruined staircase which leads down to the halls. The only treasure in this section are 250 gold coins and some enchanted bolts on the corpse at the base of the ruined tower. There are three doorways in this section; two lead outside while the other grants you access to the Shrine. If you let Mjording try and rescue his wife during the Fiancee Lost quest, his corpse will be found in this section. If Eranil and Arelis Lloran are with you on the Gah Sadrith Inquisition quest, a magical barrier will appear in this section to block the exits.
ShrineEdit


You will begin this section inside a massive excavated cavern, at the foot of a huge daedric citadel with a giant statue of Mehrunes Dagon at the top. This section is inhabited by Eranil, Arelis Lloran, and four daedra worshippers. Speaking with Eranil will start the Gah Sadrith Inquisition quest. Underneath the statue of Dagon is the only loot to be found in this section: a ruby, a pearl, a grand soul gem, a daedra's heart, a cursed ruby, a cursed diamond, and the unique spear Anarchy. If you pick up Anarchy, it will disappear, and the powerful Dremora Lord Drekhva Yashaz will appear and attack you. There are three exits from this section: the two at the base of the citadel lead to the Flooded and the Outer Halls while the one halfway up the citadel takes you to the Pit of Sacrifice.
Flooded HallsEdit
These next halls are, as the name suggests, flooded. This section contains another smaller shrine to Dagon and a small side room above the flood waters. There are three daedra worshippers in this section: one in the shrine room and two in the side room. There is some good treasure in this area; on the shrine there is a daedric steel broadsword and several gems while in the side room you will find a master's lockpick, a master's mortar and pestle, and some skooma, alongside several other potions.
Pit of SacrificeEdit

In this section, daedra worshippers make grisly sacrifices to appease their lord. The first chamber is small, and has a deep pit which is used for disposing of corpses. This cavern contains four Clannfear and numerous corpses. The ledge drops off with no paths back, so levitation is quite useful. The larger cavern to the north contains three daedra worshippers and a reasonable amount of loot; including N'Gasta! Kvata! Kvakis! and two Scrolls of Lesser Domination. The long chamber to the east is where the prisoners are kept in suspended cages before they are sacrificed. It is here that Melie, the fiancée of Mjording can be found for the Fiancee Lost quest. The key for releasing her from her shackles is on the table west of the entrance, next to a bottle of skooma and the book Realizations of Acrobacy. The lord of the daedra worshippers in Yashazmus, Ilwen, is also found in this room during the Gah Sadrith Inquisition quest.
Related QuestsEdit
- Gah Sadrith Inquisition: Gah Sadrith is shaken by an evil daedra worshipper. Find out who it is.
- Fiancee Lost: Investigate the disappearance of a Nord adventurer's lover.
- The Pawns of the Outer Planes: Banish a meddling Dremora Lord.
PeopleEdit
| Name | Race | Class | Faction | Level | Health | Magicka | Alarm | Fight | Location | Notes | |
|---|---|---|---|---|---|---|---|---|---|---|---|
| Arelis Lloran | Dark Elf | Crusader | 36 | 275 | 156 | 90 | 30 | Yashazmus, Shrine | Features in the quest: Gah Sadrith Inquisition | ||
| Drynjot the Frostbitten | Nord | Barbarian | 22 | 194 | 94 | 0 | 100 | Yashazmus, Flooded Halls | |||
| Enarvy Balvel | Dark Elf | Thief | 18 | 128 | 134 | 0 | 90 | Yashazmus, Pit of Sacrifice | |||
| Eranil | Dark Elf | Witchhunter | 33 | 160 | 200 | 90 | 30 | Yashazmus, Shrine | Features in the quest: Gah Sadrith Inquisition | ||
| Estina | Wood Elf | Archer | 21 | 165 | 112 | 0 | 100 | Yashazmus, Shrine | |||
| Fernil Yantus | Dark Elf | Commoner | 8 | 86 | 96 | 90 | 30 | Yashazmus, Pit of Sacrifice | Already dead, Features in the quest Fiancee Lost | ||
| Hyaril | High Elf | Sorcerer | 25 | 162 | 300 | 0 | 100 | Yashazmus, Shrine | |||
| Ignar the Butcher | Nord | Master-at-Arms | 23 | 232 | 96 | 0 | 100 | Yashazmus, Pit of Sacrifice | Trainer | ||
| Ilwen | High Elf | Spellsword | Great House Telvanni (Retainer) | 46 | 275 | 200 | 0 | 30 | Yashazmus, Pit of Sacrifice | Features in the quest: Gah Sadrith Inquisition | |
| Melie | Breton | Healer | 10 | 100 | 400 | 0 | 10 | Yashazmus, Pit of Sacrifice | Features in the quest: Fiancee Lost | ||
| Nidali Drom | Dark Elf | Witch | 24 | 126 | 500 | 0 | 100 | Yashazmus, Flooded Halls | |||
| Rilam Nethrend | Dark Elf | Knight | 23 | 198 | 128 | 0 | 100 | Yashazmus, Shrine | |||
| Riniso | Redguard | Warrior | 21 | 220 | 92 | 0 | 100 | Yashazmus, Flooded Halls | |||
| Vilvan Nelvani | Dark Elf | Warlock | 30 | 154 | 300 | 0 | 90 | Yashazmus, Pit of Sacrifice | |||
| Volenu Salvi | Dark Elf | Warrior | 20 | 208 | 110 | 0 | 100 | Yashazmus, Shrine |
MapsEdit
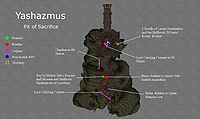
Map of Yashazmus, Pit of Sacrifice
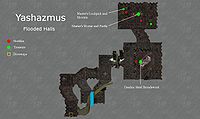
Map of Yashazmus, Flooded Halls
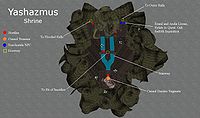
Map of Yashazmus, Shrine
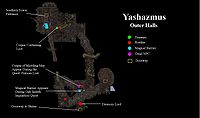
Map of Yashazmus, Outer Halls


