| Vaermina (lore page) |
|||
|---|---|---|---|
| Location | Godrun's Dream Emeric's Dream The Mythos Vaults |
||
| Race | Daedric Prince | Gender | Female |
| Other Information | |||
| Faction(s) | Supernal Dreamers, Hidden Kindred, Dreamcarver Clan | ||


Vaermina is a Daedric Prince whose sphere is the realm of dreams and nightmares, and is the deity worshiped by the Supernal Dreamers, a cult terrorizing Stormhaven. She will speak to you during certain quests as the Statue of Vaermina within her realm, the Quagmire. Unique teleportation devices called "Vaermina's Mirrors" are also associated with her. For more information see the lore page.
Related QuestsEdit

 Godrun's Dream: Rescue the general from the realm of nightmares.
- Vaermina's Gambit: Face the Night Terror and end the threat to Stormhaven.
- Song of Awakening: Find out why the sky has turned a nightmarish purple.
- A Hidden Fate
 : Research the relic, the rite, and the dream.
 - Conclave of Fate : Prevent a House Telvanni disaster.
- A Calamity of Fate : Investigate what is going wrong with Apocrypha.
- An Unhealthy Fate : Find and banish Vaermina from Apocrypha.
- Chronicle of Fate : Learn what was forgotten.
Quest-Related EventsEdit
Base GameEdit
Godrun's DreamEdit
In Godrun's Dream, Vaermina will acknowledge you after defeating the Omen of Betrayal:
- Vaermina: "You're a fool to cross me, mortal. I wish your presence in Quagmire. Come to me."
When you speak to her statue, the following conversation will ensue:
- "You mortals. Always such high aspirations. You dream of interfering with my plans, but it is a fantasy."
- I freed General Godrun, didn't I?
- "Do you really think my manipulations would be so vulnerable? You are not even a hindrance."
- I don't believe you.
- "The success of the Omens was never critical. This was a daydream. The nightmare begins now.
You fool. You protected your general … but you sacrificed your king!" - What have you done to the king?
- I don't like the sound of this.
- "Of course you don't.
You actually believed my manipulations would be so vulnerable? You are not even a hindrance." - Then I guess I can be on my way?
- "You can. There's nothing you can do now. The Omens were a distraction, a daydream. Now, the real nightmare begins!
You see … you protected your general … but you sacrificed your king!" - What have you done to the king?
- "Of course you don't.
After the final dialogue option is chosen, Vaermina will leave and open a mirror back to the entrance of the dream, east of Aphren's Hold.
Vaermina's GambitEdit
In Emeric's Dream, after slaying the Omen of Betrayal and freeing Emeric, Vaermina will ask you to go through her mirror to speak to her:
- Vaermina: "I would speak to you again, mortal. Come to the mirror, to Quagmire."
When you speak to her statue, the following conversation will ensue:
- "I'm impressed, mortal. You navigated my nightmares without losing your nerve, and yes, you have saved your little king … for now."
- I'll save him again if I have to.
- "Of course you will.
You have slain my consort as well. I'll get over my loss, but I think I'll keep you here for a while in his stead.
Perhaps a century or two will teach you humility …." - We'll see about that.
- "Perhaps we will. You have proven resourceful in the past.
Even if you escape Quagmire, mortal, you will not escape my vengeance. I can be patient, very patient. Goodbye … for now."
Song of AwakeningEdit
She will be responsible for trapping the skalds in Quagmire. When you get Engling's lute to Maraamur to sing the "Song of Sinmur" to undo Vaermina's spell, she'll gloat:
- Vaermina : "Wriggle all you want, little worm. These fish will not escape my hook."
After driving off her forces, she'll say:
- Vaermina : "Enjoy the taste of success. These morsels have to sleep again. Sometime."
NecromEdit
| This page or section is incomplete. You can help by adding to it. For more information, see the help files, the style guide, and this article's talk page. |
Hidden FateEdit
While inside a memory of Hermaeus Mora, you will witness a vision of him floating in front of a statue of Vaermina:
- Vaermina: "I won't let you do this, fate-forger!"
- Hermaeus Mora: "It is already done. You will forget this ever happened. Everyone will. It is the only way to preserve reality."
- Vaermina: "Damn you, Mora! Damn—no!"
- <Vaermina's statue explodes and the vision disapears>
- Meln the Mouthless: "A spell to make all of reality forget … I can barely imagine. Come on, we need to find Torvesard."
Conclave of FateEdit
After you closing the Black Book and retrieving it in the ruins of Vaermina, Blightcrown will use this chance to kill Master Shelreni to allow Vaermina to take over her body:
- Master Shelreni: "Taking the Black Book won't stop us. And one of you will serve just as well as a sacrifice."
- Blightcrown: "No need to involve outsiders, Shelreni."
- <Blightcrown backstabs Master Shelreni and she dies.>
- Blightcrown: "Prince Vaermina accepts your sacrifice and deems you a worthy vessel!"
- <Vaermina possesses the corpse and she floats in the air as a poral to Apocrypha opens.>
- Torvesard: "I regret the bloodshed, but soon Mora's injustice will be undone."
- Vaermina: "With this vessel, I can enter Apocrypha and strike at Mora's heart! With me, my faithful!"
- <Vaermina enters Apocrypha with Blightcrown, while Torvesard leaves through his own portal.>
A Calamity of FateEdit
Vaermina possessing Master Shelreni's body will infiltrate the memories of Hermaeus Mora. Shortly after you enter the Eye of Mora, Vaermina will confront you:
- Scruut: "What happened to this memory? It looks more like a dream … or a nightmare."
- Meln the Mouthless: "Another Daedric Prince memory? You take me to the nicest places."
- Scruut: "This has to be Vaermina's fault. Stupid Prince of Dreams!"
- Vaermina: "This memory is mine now, mortal!"
- Vaermina: "I have wrapped it in a dream of my own creation!"
- <Vaermina disappears.>
- Scruut: "We need to discuss this, mortal."
After uncovering all the flawed illusions placed by Vaermina. She will reveal she got what she came for:
- Hermaeus Mora: "Who dares invade my private memories?"
- Vaermina: "We got what we came here for, Torvesard. This way!"
- Hermaeus Mora: "How dare Vaermina enter my realm!"
- Hermaeus Mora: "Find her! Protect the three glyphics. Go and enter the Mythos!"
As you get closer to Vaermina and Torvesard in the process of stealing the glyphic, you will overhear Vaermina:
- Vaermina: "We're sure the glyphic is on the other side of that door? That we can reach it through this memory?"
- Scruut: "We need to hurry, mortal!"
Vaermina will have corrupted the memory, but you are eventually able to piece it together. Soon Hermaeus Mora arrives and bids you to enter the Mythos to stop them from touching the Glyphic of Hidden Paths. Once inside the Mythos, you will find Vaermina waiting for Torvesard to unlock the wards:
- Vaermina: "How much longer, Torvesard?"
- Torvesard: "These locks have held for millennia. Just a little more …."
Vaermina will then notice you and summon Mezzamma the Lurker to fight you.
After Mezzamma the Lurker is slain, Hermaeus Mora will appear before the last seal is broken:
- Vaermina: "No! Hermaeus Mora approaches!"
- Torvesard: "But we're so close!"
- Vaermina: "Damn you, Mora! We must slip away while we can, Torvesard."
- <Vaermina and Torvesard flee.>
- Hermaeus Mora: "The Dreamweaver flees, but what of the glyphic vault?"
- Hermaeus Mora: "Vaermina will pay for the damage she has wrought on my realm!"
- Hermaeus Mora: "Approach, chosen, and hear my words."
Speaking with Hermaeus Mora, he will ask you to view the Glyphic of Hidden Paths, to understand how it all started. Using the Glyphic, you will see three statues representing Hermaeus Mora, Vaermina and Peryite appear:
- Vaermina: "Why have you called us all together, Prince of Fate?"
- Hermaeus Mora: "We must deal with this problem, Dreamweaver. I have seen what happens if we do nothing."
- Hermaeus Mora: "Already the threads of fate unravel. They have no regard for the chaos they can cause!"
- <Torvesard suddenly appears out of hiding and walks up to the Prince of Fate.>
- Torvesard: "That's it! What I needed to spark my memory! I will restore the rest, Lord of Secrets. I will restore it all!"
- <Torvesard disappears again as suddenly as he arrived.>
- Hermaeus Mora: "Torvesard! Only one of the Unseen could evade my sight here!"
- Hermaeus Mora: "Chosen, we must speak."
An Unhealthy FateEdit
Going through the portal will begin the final battles of this quest series, do any necessary preparations you need to beforehand. On the other side of the portal you will appear within sight of Blightcrown and Vaermina possessing Master Shelreni's body. Torvesard will immediately break off on his own. Gadayn and Scruut will head off to destroy the Blightcrown's manufactories through the western portal, while you, Meln, and Leramil go through the eastern portal to handle the manufactories on that side:
- Vaermina: "Fate's champions pursue us, Blightcrown. Deal with them while I locate the glyphics."
- Blightcrown: "Oh, my manufactories of corruption will keep them busy, Prince Vaermina."
- Torvesard: "Disable Blightcrown's manufactories and the corruption will dissipate. Just shatter the dream crystal that binds them to the Mythos."
- Torvesard: "Save Apocrypha while I pursue Vaermina."
- <Torvesard opens a portal and leaves.>
- Scruut: "Come, Gadayn. We'll take the west portal and leave the east to Leramil and fate's chosen."
- Leramil the Wise: "Good thinking, Scruut. This way, proxy."
After defeating Blightcrown, you will go through the portal to the Mythos where you will arrive at the same location you saw within the memory of Hermaeus Mora. Vaermina will be directly ahead of you.
- Meln the Mouthless: "The power I sense up ahead … it must be Vaermina."
- Vaermina: "You. I know you. The Dream-breaker from Stormhaven. You will not slink away this time. Die, mortal! (If you stopped her plot in Stormhaven)
Otherwise, if you have not met her before, she will say:
- Vaermina: "Torvesard tells me fate chose you. Well, he chose poorly. Time to die, mortal!"
When the fight begins:
- Vaermina: "While I wear Shelreni's mortal shell, Mora cannot find me. You must face me alone, mortal!"
During the fight, she will taunt you:
- Vaermina: "I will regain what fate took from me!"
- Vaermina: "You cannot resist my power!"
- Vaermina: "Now you die!"
- Vaermina: "I can grant your dreams or feed your nightmares!"
- Vaermina: "Let me end your suffering!"
- Vaermina: "Every dream becomes a nightmare!"
You do not have any real means to defeat Vaermina, but you can destroy the body she is puppeting, which will allow Hermaeus Mora to intervene. Vaermina will use teleportation, summon nightmare clones of herself, create beams that cross the length of the battle arena, and shield herself from all damage. This will give ghost sight another chance to shine. By destroying her nightmare clones, you can use ghost sight to attack Shelreni's body directly.
You will eventually destroy Shelreni's body and force Vaermina to exit it, leaving beind nothing but a bloody puddle in the middle of the arena. From it, Vaermina will emerge in the form of a Nightmare. You will once again need ghost sight to finish her off.
- Vaermina: "You destroyed my mortal shell! Now face a true nightmare!"
- <Vaermina turns into a Nightmare.>
- Vaermina: "Ah, what perfect terror!"
- Meln the Mouthless: "Without Shelreni's body, Vaermina takes on a more nightmarish form."
Throughout this stage of the fight:
- Vaermina: "Your nightmare will never end, mortal!"
- Vaermina: "What nightmare can I draw from your darkest dreams?"
- Vaermina: "The more you struggle, the faster you lose!"
Defeat her nightmare form, and Vaermina will finally be forced to fight you with her full might, and Hermaeus Mora will still not have appeared. With no options remaining, Meln will tell you to use the Black Book to slow her down:
- Meln the Mouthless: "This can't be good."
- Vaermina: "You don't like my nightmares? Then face me in my true form!"
- Meln the Mouthless: "We're out of options. Use the Black Book!"
You will use the book to fire a beam at Vaermina:
- Vaermina: "Mora's trinket can't harm me!"
- Hermaeus Mora: "No, but it helped me locate a loathsome intruder."
- Vaermina: "Hermaeus Mora has found me? No!"
- Hermaeus Mora: "I am here, chosen. Unleash my power as you will! Wield the book again! Together we'll expel this common thief!"
With Hermaeus Mora's presence, your beam will have much more punch to it. He will also assist you by attacking her directly as well, causing her to dissipate:
- Vaermina: "No! I was so close! Curse you, Prince of Fate, and curse your damn mortal!"
- Hermaeus Mora: "Vaermina has been cast out and Peryite's contamination wanes. Well done, chosen. Now, enter the second vault and make sure the glyphic is secure."
Chronicle of FateEdit
When you locate Torvesard with the second stolen glyphic, near Cipher's Midden, you can hear some stray words coming from the Glyphic of Lost Memories:
- Meln the Mouthless: "Look!"
- <Torvesard intently listens to the glyphic.>
- Torvesard: "Again."
- Peryite: "… too far, Mora!"
- Vaermina: "It doesn't matter what you foresee …."
- Hermaeus Mora: "… reality, you must all … forget!"
- Torvesard: "And there it is. Another piece of my memory restored. We should speak, mortal."
You speak with Torvesard and learn the secret Hermaeus Mora tried to keep forgotten for so long. Torvesard invites you to view the glyphic and leaves, having achieved what he wanted.

Interacting with the Glyphic of Lost Memories, your surroundings become a starscape and this time you fully hear and see the argument:
- <Peryite's Statue appears>
- Peryite: "You go too far, Mora!"
- <Vaermina's Statue appears>
- Vaermina: "It doesn't matter what you foresee. You can't do this to another Prince! Or to the rest of us, for that matter!"
- <Hermaeus Mora's Statue appears between them>
- Hermaeus Mora: "You have seen the damage Prince Ithelia has already done to the fabric of fate. If left unchecked, reality will unravel."
- Vaermina: "All of us must agree, Mora. And I definitely do not. Memories are sacrosanct, as are the domains of the Princes!"
- Peryite: "You can't punish someone for something they might possibly do."
- Hermaeus Mora: "I must. The risk is too great. I am truly sorry, but there is no alternative. For the sake of reality, you must all … forget!"
- <There is a flash of light, the memory's surrounding drip down like ink, revealing reality and the actual Hermaeus Mora watching you.>
- Hermaeus Mora: "What was forgotten has been remembered. We must speak."
GalleryEdit
-
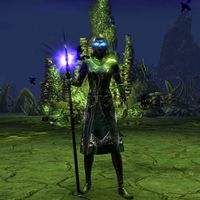
Vaermina possessing Shelreni Baro's body
-
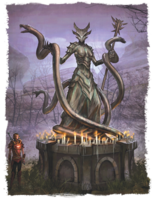
Concept art of Vaermina's statue
-
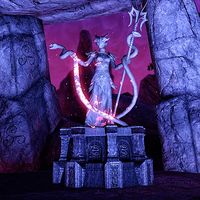
Vaermina's Statue in Godrun's Dream
-
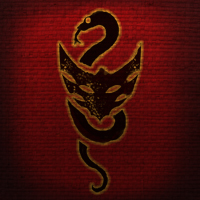
Vaermina's emblem
-

Vaermina's mask


NotesEdit
- Cut dialogue implies that Hircine and the Glenmoril Wyrd may have originally planned to be the antagonists in Stormhaven, instead of Vaermina and her Supernal Dreamers. For more info, please see the Cut Content article.