| Torvesard (lore page) |
|||
|---|---|---|---|
| Location | Apocrypha, Boethiah's Forge, Catalog Boss Location, Cipher's Midden, Fathoms Drift, Haldain Lumber Camp, Necropolis Catacombs, The Infinite Panopticon, The Mythos Vaults Elenglynn, Fargrave Inner Quarter, Ithelia's Prison, Ithelia's Shrine, Loom of the Untraveled Road, Miscarcand, Niryastare, Prince Ithelia's Prison, Sanctuary of Whispers, Shrine of Inevitable Secrets |
||
| Race | Dremora | Gender | Male |
| Health | 39,959 | ||
| Reaction | Friendly | ||
| Other Information | |||
| Faction(s) | Shardborn | ||

Torvesard is a clanless Dremora who refuses to let the secrets of Apocrypha go undisturbed. He is encountered throughout Apocrypha and the Telvanni Peninsula while you serve Hermaeus Mora in his attempts to protect said secrets. He wields a maul and has illusion-based duplication abilities, as well as the odd skill of showing up anywhere near undetected.
He has been described as having complex allegiances and motivations, making it difficult to discern whether he is friend or foe.[1]
Related QuestsEdit
 Keeper of the Fate: Investigate strange happenings in Necrom.
- Fate's Lost Dream: Investigate strange happenings in Alavelis.
- Spirit of Fate: Investigate strange happenings in Tel Rendys.
- A Hidden Fate: Research the relic, the rite, and the dream.
- A Calamity of Fate: Investigate what is going wrong with Apocrypha.
- An Unhealthy Fate: Find and banish Vaermina from Apocrypha.
- Chronicle of Fate: Learn what was forgotten.
- Prisoner of Fate: Stop Torvesard from freeing Prince Ithelia!
- Paths of Chaos
 : Investigate disturbances across West Weald caused by Ithelia's return.
 - The Many Paths : Look into the tangled threads of fates at the Outcast Inn and help Ithelia.
- Relics of the Three Princes : Recover the three Daedric artifacts that were used to bind Ithelia once before.
- King Nantharion's Gambit : Confront the leader of the Recollection to save West Weald from being overtaken by jungle.
- The Untraveled Road : Enter Mirrormoor and prevent Ithelia from rewriting history.
- Ithelia's Fury: Seal tears in reality caused by the instability of Ithelia's power.
- Fate of the Forgotten Prince: Face Prince Ithelia and decide her fate.
Quest-Related EventsEdit
NecromEdit
Keeper of the FateEdit
While helping Curate Gadayn solve the mystery behind the sudden sickness within the Necropolis, you soon learn it is a plot by the Hidden Kindred to steal the relic, the Fulcrum Obscura. After you reach where it is held in the Catacombs, you will soon find Prelate Faram and Torvesard already there in the middle of taking it:
- Prelate Faram: "Ah, the Fulcrum Obscura—wait. Someone approaches, Torvesard. Quick, take the relic!"
- <Torvesard attempts to take the relic.>
- Torvesard: "The relic broke! Still, this portion contains the power we need. I leave our guests to you, Blightcrown."
- <At this, Torvesard opens a portal and green miasma surrounds Prelate Faram, clearing to reveal Blightcrown.>
- Blightcrown: "The time to hide is over. Behold Blightcrown, most favored priest of Peryite! I leave you with a blessing from the Prince of Pestilence!"
After Plague-Gusher is summoned, Blightcrown follows Torvesard through the portal.
Fate's Lost DreamEdit
While investigating what is happening in the mining town of Alavelis with Scruut, you soon find yourself entering a portal to Apocrypha and chasing after the Hidden Kindred and their Daedric allies. Your chase leads you to the Tranquil Catalog where you need to access the Pool of Inquiry to find out what the invaders are searching for. Once in the Tranquil Archives, you will encounter Torvesard speaking with Kynreeve Ryl across the abyss:
- Scruut: "The Tranquil Archives. One of the main repositories for Hermaeus Mora's glyphics. We need to find the invaders, mortal."
- Torvesard: "Ah, this is the glyphic! Now I know where to find the memory of the dream your Prince helped me remember, despite your predilections, Ryl."
- Kynreeve Ryl: "Prince Vaermina commands me to punish Mora's servants, clanless. So I do."
- <Torvesard turns and looks at you on the other side.>
- Torvesard: "Excessive and pointless, but I have what I came for. I'm leaving."
- <Torvesard walks away through a portal.>
- Kynreeve Ryl: "Do what you will. I'll deal with our eavesdroppers."
Spirit of FateEdit
While investigating Tel Rendys with Leramil the Wise, you soon find out Master Shelreni and the Dusksabers are trying to enter the barricaded tower to retrieve a book called the Tormenting Eye, which is one of the eldritch Black Books of Hermaeus Mora. You soon encounter the spirit of Meln the Mouthless, who is swiftly captured in a Soul Gem and taken to her tower where she will try and get him to reveal how to unlock the book to read it.
After you enter the tower of Tel Baro, you will soon overhear Master Shelreni speaking with Torvesard:
- Master Shelreni: "Meln is in my power, Torvesard. He'll unlock the Black Book soon enough."
- Torvesard: "He better, Shelreni. We need the rite hidden within The Tormenting Eye or else all is for naught."
- Master Shelreni: "Tell the Princes. I'll uphold my end of the bargain. I expect them to uphold theirs."
A Hidden FateEdit
After you have entered the Infinite Panopticon to find the Fulcrum Obscura and destroyed the censers infecting the area, you will eventually catch up to Torvesard and Blightcrown and overhear them speaking about their goal:
- Torvesard: "See how the Fulcrum vibrates? What we seek is here."
- Blightcrown: "Another eye? It looks like all the others to me."
- Torvesard: "Have faith, diseased one. This eye contains the memory of the dream we seek."
- Blightcrown: "Then let's get this over with. I can't hide us between the layers of reality much longer."
- <Torvesard turns and looks down at you and your group.>
- Torvesard: "Ah, fate's mortals. I have no wish to harm you. Turn back and let us finish what we started."
- <Torvesard turns away and walks into the Eye of Mora.>
- Leramil the Wise: "They dare enter one of Hermaeus Mora's forbidden memories? We must follow them! Let me open a portal …. There!"
- Meln the Mouthless: "Proceed carefully. Between the energy here and Blightcrown's manipulation of reality, Leramil's portal could behave erratically."
You can follow them through the Panopticon until you reach the Eye of Mora they entered. Once inside, you will find yourself in a memory of a cavern. Further down the passage, you will come across Torvesard:
- Meln the Mouthless: "You're as transparent as I am! And look, there's Torvesard!"
- Torvesard: "We're in a memory of Hermaeus Mora, mortal. Here, no harm may befall us. I suggest we use this opportunity to confer."
Talk with him to see what you can learn from him:
- "When dealing with matters of fate, meetings such as this meeting are inevitable.
Know that I am Torvesard. And know that we need not be adversaries in these matters. I simply seek an ancient dream, barely remembered. Lost knowledge, nothing more." - The knowledge you seek can destroy reality.
- "Is that what Hermaeus Mora and his High Elf lackey told you? Can you imagine any revelation that possesses such power?
No, this is about keeping secrets. Hoarding knowledge. Stealing memories. Hermaeus Mora, the great miser of Oblivion!" - Then tell me more about the knowledge you seek.
- "All I have is fragments of a dream. Even Vaermina could not help me recall it. But we remembered enough to get us this far. Hermaeus Mora stole this knowledge from us.
I do not wish to harm you, mortal. To harm anyone. But I will learn the truth." - And where's Blightcrown? Why are you working with Peryite's priest?
- "The pompous mortal riddled with disease? The memory rejected him. We entered together but I stand here, alone. Except for you.
But worry not for Peryite's priest. Blightcrown has skills. It should be a simple matter for him to return to Nirn." - So what now, Torvesard?
- "I will continue my search. You, however, should turn back. Wandering the memories of a Daedric Prince is dangerous for one such as I. For you, such a journey will most likely prove fatal.
I would hate to see fate's chosen reach such an ignoble end."
After he said his piece, he will open a portal and take his leave:
- Torvesard: "Heed my words, mortal."
- <Torvesard enters the portal and leaves.>
- Meln the Mouthless: "If I learned anything as a Telvanni magister, it's this. When a Dremora tells you to go right, you go left. Let's see what this memory contains."
Progressing the memory, you will soon reach a massive shrine to Vaermina. As you approach you will see the memory play out, Hermaeus Mora floats in front of a statue of Vaermina. Words are spoken between the pair, with Mora insisting he has done something to protect reality and that everyone would be made to forget. As you reach the base of the destroyed statue of Vaermina, Torvesard will appear out of a portal:
- Torvesard: "And now you know of Hermaeus Mora's grand betrayal. Once I restore Vaermina's statue, the process of restoring the memory will begin."
- Torvesard: "I suggest you defend yourself, mortal."
You will need to fight off Dreamcarvers and Ravenous Hungers, while this is happening he will be restoring the statue. By the time Mora arrives, Torvesard will have restored the statue and thus changed the memory:
- Torvesard: "The Prince of Fate comes, but too late! What was shattered has been restored!"
- <He opens a portal and leaves.>
- Hermaeus Mora: "Who dares enter this forbidden memory? No! What have you done?"
- Hermaeus Mora: "Flee while you can, transgressor! Your reckless actions threaten all of reality!"
- Hermaeus Mora: "This memory has changed. Chosen, speak with me."
Conclave of FateEdit
During this quest, you will have to attend the Assembly of Masters to warn the Telvanni of Master Shelreni's plans to kill them all while they put her on trial. Although Master Gothren prevents Shelreni from killing anyone, Master Marena is kidnapped and is brought to the Shrine of Vaermina which is the location where the Mora's memory from A Hidden Fate takes place. You will find Shelreni has opened the Black Book and is using the ritual to apparently transfer Vaermina's essence to Master Marena's body. While Torvesard is watching the ritual take place he does not comment on it despite Blightcrown talking to him.
You manage to arrive in time to interupt the ritual and fight off the Aspect of Vaermina. Afterwards, while you manage to free Master Marena and recover the Black Book, it turns out there is a back up plan in play:
- Master Shelreni: "Taking the Black Book won't stop us. And one of you will serve just as well as a sacrifice."
- Blightcrown: "No need to involve outsiders, Shelreni."
- <Blightcrown backstabs Master Shelreni and she dies.>
- Blightcrown: "Prince Vaermina accepts your sacrifice and deems you a worthy vessel!"
- <Vaermina possesses the corpse and she floats in the air as a poral to Apocrypha opens.>
- Torvesard: "I regret the bloodshed, but soon Mora's injustice will be undone."
- Vaermina: "With this vessel, I can enter Apocrypha and strike at Mora's heart! With me, my faithful!"
- <Vaermina enters Apocrypha with Blightcrown, while Torvesard leaves through his own portal.>
A Calamity of FateEdit
After Vaermina enters Apocrypha while hidden in a mortal's body, you will need to follow leads to find out the plans of the Hidden Kindred and their daedric allies. You first speak with Master Shelreni's spirit who reveals that they plan to invade another memory of Hermaeus Mora. You then return to the Infinite Panopticon to chase after Vaermina, Torvesard will accompany her and Blightcrown as he goes to recover a memory of his from another Eye of Mora.
Vaermina will have corrupted the memory, but you are eventually able to piece it together. Soon Hermaeus Mora arrives and bids you to enter the Mythos to stop them from touching the Glyphic of Hidden Paths. Once inside the Mythos, you will find Vaermina waiting for Torvesard to unlock the wards:
- Vaermina: "How much longer, Torvesard?"
- Torvesard: "These locks have held for millennia. Just a little more …."
Vaermina will then notice you and summon Mezzamma the Lurker to fight you. While this is happening, Torvesard will continue his work:
- Torvesard: "Almost … got it …."
After Mezzamma the Lurker is slain, Hermaeus Mora will appear before the last seal is broken:
- Vaermina: "No! Hermaeus Mora approaches!"
- Torvesard: "But we're so close!"
- Vaermina: "Damn you, Mora! We must slip away while we can, Torvesard."
- <Vaermina and Torvesard flee.>
- Hermaeus Mora: "The Dreamweaver flees, but what of the glyphic vault?"
- Hermaeus Mora: "Vaermina will pay for the damage she has wrought on my realm!"
- Hermaeus Mora: "Approach, chosen, and hear my words."
Speaking with Hermaeus Mora, he will ask you to view the Glyphic of Hidden Paths, to understand how it all started. Using the Glyphic, you will see three statues representing Hermaeus Mora, Vaermina and Peryite appear:
- Vaermina: "Why have you called us all together, Prince of Fate?"
- Hermaeus Mora: "We must deal with this problem, Dreamweaver. I have seen what happens if we do nothing."
- Hermaeus Mora: "Already the threads of fate unravel. They have no regard for the chaos they can cause!"
- <Torvesard suddenly appears out of hiding and walks up to the Prince of Fate.>
- Torvesard: "That's it! What I needed to spark my memory! I will restore the rest, Lord of Secrets. I will restore it all!"
- <Torvesard disappears again as suddenly as he arrived.>
- Hermaeus Mora: "Torvesard! Only one of the Unseen could evade my sight here!"
- Hermaeus Mora: "Chosen, we must speak."
An Unhealthy FateEdit
After the events of A Calamity of Fate Hermaeus Mora will be feeling the efforts of the attacks on him and his realm. His subjects and some of your allies are also feeling the effects, leading them to become sick and lash out at everyone. After you investigate and stop the sabotage at Cipher's Midden, you can return to your allies only to find Scruut and Leramil have gotten worse. After you have spoken with the sickly Scruut, Torvesard will teleport into the room:
- Torvesard: "Your allies suffer needlessly, mortal. Allow me to aid them."
- Curate Gadayn: "This affliction is beyond my skills, friend. See what the Dremora has to offer."
Speak with Torvesard to find out why he is offering his help:
- "Vaermina and Peryite have gone too far with their corruption. It works its way into the very fabric of Apocrypha. You only need to look to your two allies to see the harm it causes.
I can ease their suffering, mortal." - You've been working with Vaermina and Peryite the whole time. Why should I trust anything you say?
- "It was an alliance of necessity. I needed their assistance to recover that which was taken from us in ancient times. Hermaeus Mora did what he thought right, as have I. I have no desire to punish him for following his nature."
- So what exactly are you offering?
- "I know where to find Blightcrown so that you can stop him before he does irreparable damage to this realm. And I can show you where Vaermina has gone. I no longer care to share the ancient memory with her or Peryite."
- Why would you help me after all this?
- "Because I also require help. I offer a trade. An end to this assault on Apocrypha for the assistance of fate's chosen.
Decide, mortal. Blightcrown even now works his way toward the core of this realm. Soon it will be too late to reverse the damage." - All right. Tell me where to find Blightcrown.
- "I will mark a location on your map. Here we can open a path to the place Hermaeus Mora calls the Mythos. Not to a memory this time, but to the here and now.
Then you can stop Blightcrown before the corruption becomes irreversible." - Very well. Now aid Leramil and Scruut. / What do you mean, open a path?
He will then open a portal and say:
- Torvesard: "It will take all of us to reach the Mythos. Allow me to ease the suffering of your allies."
- Scruut: "I can see again!"
- Leramil the Wise: "Go, proxy. I shall join you at the location."
Speaking with Torvesard before entering the portal:
- "I, too, shall meet you at the Mythos. It will take all of us working together to end the threat posed by Blightcrown and Vaermina.
Just know that the relief I granted your allies is fleeting. As long as the corruption persists, they are in danger."
Once at the site, you will need to help Leramil and Torvesard to align the threads of fate to enter the Mythos. You have the option of speaking with Torvesard prior to this:
- "Mortals manipulating the very strands of fate. How unlike Hermaeus Mora to put such power in your hands. He must be truly desperate to keep us in the dark concerning the crimes he perpetrated so long ago."
- If we're going to help each other, I need to know what you're really after.
- "I assumed my intentions were quite clear. I seek to restore that which was wiped from existence in the ancient past by Hermaeus Mora. The memories that I only suspected were real because of the dream that haunted me."
- Why did you think this dream was so important?
- "Because Daedra do not normally dream. And this one was relentless. Recurring night after night. A vision of a statue of Vaermina and the ever present gaze of Hermaeus Mora.
I originally sought out the Prince of Dream's help to make sense of it all." - So that's how you got involved with Vaermina and the Hidden Kindred?
- "Obviously. But all Vaermina was able to do was determine that she and Peryite shared the barest recollection of the same memory. That knowledge bound us together. We pooled our resources and planned to recover the stolen memory from Apocrypha."
- But who are you? You have no clan and Hermaeus Mora called you one of the Unseen.
- "I cannot answer those questions. I have no memory of life before I lost my clan. I don't even know where I originally come from. A part of my past is missing. A part of me. And I won't rest until I recover it.
Some memory returns, but not enough."
As you align one of the threads, you will hear Torvesard comment:
- Torvesard: "Another layer aligns. The way is opening."
Before you bring the portal in full alignment:
- "Do as Leramil says, mortal. Bringing these disparate threads into alignment is no easy task!"
After you have opened the way to the Mythos, Hermaeus Mora will arrive and ask to talk to you. If you speak with Torvesard beforehand:
- "Your master beckons, mortal.
Tell him I have no wish to continue the assault on his realm. In fact, I wish to end it."
Once you have spoken with Mora, he will summon the rest of your allies:
- Hermaeus Mora: "I call forth all whose fates are intertwined with yours, chosen. Only together can you save reality."
- <Scruut, Curate Gadayn and Meln appear.>
- Curate Gadayn: "Have I mentioned how much I detest teleportation?"
- Meln the Mouthless: "You certainly do tend to collect an odd assortment of companions."
- Torvesard: "The path to the Mythos awaits, mortal. Let us not linger too long."
You have the option of talking to your allies, including Torvesard before entering the Mythos. You can take the opportunity to ask Torvesard some questions:
- "An odd collection of allies for someone so formidable. You may count me among them. At least until our paths once again diverge.
I am ready to enter the Mythos when you are, mortal." - Why can't Hermaeus Mora sense your presence, Torvesard?
- "The Prince of Fate has his secrets and I have mine.
The truth is, however, I do not know. That is one of the things I hope to learn when I recover the stolen memory from the ancient past." - You think the memory is about you?
- "I believe the lost memory concerns us all. But yes, I think it holds a special significance for myself. What that is, I can only imagine. Not knowing, though … it drives me to reveal what was hidden. No matter the cost."
When you enter the Mythos, you will find Vaermina and Blightcrown are already there and manufactories producing the fever dream disease are active:
- Vaermina: "Fate's champions pursue us, Blightcrown. Deal with them while I locate the glyphics."
- Blightcrown: "Oh, my manufactories of corruption will keep them busy, Prince Vaermina."
- Torvesard: "Disable Blightcrown's manufactories and the corruption will dissipate. Just shatter the dream crystal that binds them to the Mythos."
- Torvesard: "Save Apocrypha while I pursue Vaermina."
- <Torvesard opens a portal and leaves.>
- Scruut: "Come, Gadayn. We'll take the west portal and leave the east to Leramil and fate's chosen."
- Leramil the Wise: "Good thinking, Scruut. This way, proxy."
You will assist your allies with destroying the manufactories. Eventually you will find and confront Blightcrown and kill him, stopping the production of any more of the disease. After this a portal to the Mythos Vaults will appear and only Meln will be able to come with you. Once in the vaults, you will need to fight Vaermina in Shelreni's body and then in her form as one of Vaermina's Nightmares. After this, Vaermina will appear in her own form and you will need to use the Tormenting Eye Black Book on her to kick her out of Apocrypha.
At Hermaeus Mora's request, he will have you check on the Glyphic of Lost Memories, as soon as you enter the vault you will find Torvesard in the middle of taking it:
- Torvesard: "And now our deal is done, mortal. I helped you save Apocrypha, and you helped me enter this vault."
- <Toversard takes the Glyphic and opens a portal.>
- Torvesard: "I will unlock this glyphic and recover the second part of the lost memory!"
- <Torvesard then leaves.>
You then leave the Vaults and speak with Hermaeus Mora.
Chronicle of FateEdit
Leramil with have you speak with Scruut about the upcoming ceremony being held in your honor. However when you meet with Scruut she will instead explain she detected a disruption in Fate near Cipher's Midden and asks you to investigate as she believes it may be Torvesard. You and Meln will follow up on this and soon find Torvesard using the Glyphic of Lost Memories at the end of path along the cliff face:
- Meln the Mouthless: "Look!"
- <Torvesard intently listens to the glyphic.>
- Torvesard: "Again."
- Peryite: "… too far, Mora!"
- Vaermina: "It doesn't matter what you foresee …."
- Hermaeus Mora: "… reality, you must all … forget!"
- Torvesard: "And there it is. Another piece of my memory restored. We should speak, mortal."
Speak with him to see what he has to say:
- "The Prince of Fate thinks himself so perfect. But for all his power, he couldn't eliminate the memory he so desperately sought to hide. Not from my dreams, not from his own mind. And now I remember most of it. Only one secret remains to uncover."
- I don't understand, Torvesard.
- "Why would you? You are merely mortal. But I have wandered the planes of Oblivion for eons, an outcast with no clan.
I believed I was formed that way. A forgotten scrap of creation. Until the dream began to haunt me. A fragment of an ancient memory." - The dream that started all this?
- "No! The dream that will end it! That will finally restore all that was lost. Hermaeus Mora caused all this with his greed and selfishness. He made us all forget. He made me forget!"
- Tell me. What secret was so dangerous it had to be obliterated? What did Mora make you forget?
- "There was another Daedric Prince! My Prince! A Prince that saved me and preserved just enough of my memory so that I could one day save them in return. A Prince whose jealous and craven siblings cast down and wiped from the annals of history."
- Another Daedric Prince? Do they still exist?
- "No Prince of Oblivion can truly be destroyed. The final glyphic contains that secret. How to find them and restore them to their rightful place. And then, Mora will answer for his crimes.
See for yourself. I leave the glyphic for you to examine."
While you examine the Glyphic, Torvesard will open a portal and leave. Meanwhile, you will witness the final part of the argument between Peryite and Vaermina against Hermaeus Mora, where the former removed all memory of Ithelia, the Prince of Paths and Mistress of the Untraveled Road.
Gold Road PrologueEdit
Prisoner of FateEdit
Soon after the events of Necrom and Scions of Ithelia, Leramil will ask to meet with you as she has word of Torvesard's movements in obtaining the third and final Glyphic he needs to find and free Ithelia. You will need to investigate three locations around Tamriel which fate says Torvesard will visit.
In Reaper's March, you will be led to the Do'Krin Temple which has a hidden shrine to Boethra. As you approach the statue of Boethra, Leramil will sight Torvesard:
- Leramil the Wise: "Why would Torvesard seek out a shrine to Boethiah—wait. Up above! Torvesard is here!"
- Torvesard: "Ah, Mora's champions. I expected to run into you eventually."
- <Torvesard takes a sword that glows red and opens a portal.>
- Torvesard: "Boethiah's blade, Abolisher, is mine now. The first of the three relics I require is in my hands."
- Torvesard: "Soon Prince Ithelia will be restored. I hope you are there to witness her glory!"
- <Torvesard leaves through the portal.>
- Leramil the Wise: "A relic of Boethiah? One moment, proxy. We should speak."
When you visit Grahtwood, you will learn Torvesard had searched the Reliquary of Stars, but was unable to find the associated relic. You also find out he has allied with the Recollection, a group of Bosmer cultists with Ayleid ties.
In Stonefalls, you will find your way to the hidden Sanctuary of Whispers within Mephala's Nest. Once you reach the deepest part of the shrine, you will find Torvesard standing in front of an empty altar:
- Torvesard: "Nothing. Fate seems to be fighting back. I wonder how much of that is because of you."
- Leramil the Wise: "Torvesard, talk to fate's chosen. Tell us what this is all about."
You can speak with Torvesard to learn what he is doing:
- "Fate's chosen? How presumptuous a title Hermaeus Mora has bestowed upon you.
The Prince of Fate is using you, mortal. Long ago, he and his allies inflicted a terrible wrong on my Prince. Now he hopes you can stop me from undoing that damage." - Tell us what you're trying to do, Torvesard. Make us understand.
- "How can a mere mortal understand the convolutions of Oblivion?
Prince Ithelia, the Prince of Paths. Mistress of the Untraveled Road. Fate-Changer. The Dark Reflection, the Last Tomorrow. She Who Saw and Wept. Mora, in his jealousy, erased her." - What do you mean, erased her?
- "Hermaeus Mora convinced other Daedric Princes to conspire against Ithelia. He played upon their fears of the unknown. None of them understood the gift of choosing what is to be.
They all turned against my Prince." - So this is about revenge?
- "Revenge? No, that is for my Prince to mete out. I am a scion of Ithelia, and my ancient purpose is to restore her to power. To undo what the cowardly Princes did to her. And the very relics they used against Ithelia will help me find her."
- Is that what you're looking for here? A relic?
- "Mephala's Skein of Secrets. Don't bother looking—it isn't here. It seems Mephala's Ayleid worshipers locked it away in some vault beneath West Weald long ago.
No matter. The Skein would help, but I'll find another way to reach my Prince." - Hermaeus Mora says reality itself will be undone if you find Ithelia.
At this, Torvesard has had enough and takes his leave:
- Torvesard: "And you believe Mora? Stand aside, mortal. I will not be swayed from my purpose."
- <Torvesard opens a portal and walks through.>
- Leramil the Wise: "A Skein of Secrets, used to defeat Ithelia long ago? I cannot help but wonder what became of it. Come, proxy. Let us speak."
After you have investigated the three locations, Leramil will realize this involves the Good Daedra and the pair of you head to Vvardenfell. Now accompanied by Curate Gadayn, you learn of an ancient plan between Azura, Boethiah, Mephala and Hermaeus Mora at Holamayan Monastery. Your investigation leads you to the ruins of Anudnabia and the demiplane known as the Shrine of Inevitable Secrets.
Fighting your way through the Recollection cultists, you catch up with Torvesard who stands in front of a portal with Boethiah's sword:
- Torvesard: "Boethiah's blade led me to this portal. The path to the Mythos, Apocrypha's heart."
- Torvesard: "Only those bearing the essence of Azura, Boethiah, or Mephala can access this portal."
- Torvesard: "The gate recognizes Boethiah's blade. Now I can return to the Mythos and find my Prince at last!"
- <Torvesard enters the portal and it closes.>
Soon after, Hermaeus Mora will arrive and reopens the portal so you can chase Torvesard. As you go through the Mythos, you will encounter Dremora calling themselves "Shardborn". When you reach the Vaults, you will reach Torvesard who remembers something important:
- Torvesard: "I remember our realm—Mirrormoor! Ithelia's servants awaken!"
- <Dexxiuk the Glass Mantikora is summoned.>
- Torvesard: "My apologies, mortal. They see anyone marked by Mora as a foe, and I have no time to tell them any different."
You will need to defeat Dexxiuk along with waves of Clan Shardborn Dremora, Glass Fragments and Mirrorplasms before you can resume the chase. Enter the portal to the Glyphic of Shattered Reflections, you will find Torvesard walking towards the third Glyphic:
- Leramil the Wise: "Torvesard! He found the last glyphic!"
- Torvesard: "The last glyphic and the final secret. I must know what happened to Prince Ithelia!"
- <He touches the glyphic and the scenery becomes green-tinted, you see the three possessed priests standing before Hermaeus Mora.>
- Hermaeus Mora: "We defeated Prince Ithelia. Now we must all forget our victory."
- Priest Dandera Helas: "Forget? Why should I forget how I took this mortal shell and tracked Ithelia with my Skein?"
- Acolyte Dugikh: "Azura and I did our part with these vessels of flesh. And the Lamp and Abolisher."
- Adept Rakzzin-jo: "Listen, my fellow Princes. The Lord of Fate is right. Imprison Ithelia in your Mythos, Mora. Then erase all memory of her existence."
- <The vision ends.>
- Torvesard: "Imprisoned by cowards? Abandoned by betrayers? But I remember! And I know how to free my Prince!"
- <Torvesard draws Abolisher, opens a portal and leaves.>
Follow him through the portal to the Mythos Spire, you will see Torvesard in the distance, opening a gate in an obelisk-structure:
- Torvesard: "Sealed away, alone for millennia? I will free my Prince and restore her glory!"
- <He goes through the gate, Leramil and Gadayn run up to it.>
- Curate Gadayn: "Torvesard opened the prison!"
Entering Ithelia's prison, you don't find the Forgotten Prince, instead you see a distraught Torvesard standing before an empty throne:
- <Torvesard drops Abolisher and picks up a shard of glass from the throne.>
- Torvesard: "Empty! After roaming Oblivion and Nirn for ages, tormented by a question I could not even frame, this is my answer? I did not forget my Prince!"
- <Torvesard throws away the glass shard and turns to you.>
Speak with Torvesard, to see what happens from here:
- "I do not understand. Where is Prince Ithelia? If she escaped, why did she not contact me?
You! Is this some new trick of the Lord of Fate?" - I'm as surprised as you are, Torvesard.
- "No. This is no trick. Do you see? Prince Ithelia has escaped. She freed herself from this prison, or was freed by some hand other than mine.
Perhaps the simple act of remembering restored her power, dissolved her bonds. I … do not know." - If she escaped, where would she have gone?
- "Prince Itelia is the Mistress of the Untraveled Road—she could be anywhere. Perhaps she will be drawn to places or things she knew before her craven foes locked her away.
Yes, that must be right. And I know what I must do. Farewell, mortal." - Where are you going?
- "I still have a task to do. I need to find my Prince. Help her. Restore her to the power that is hers by right. And there are other scions out there. I remember them, too, now.
Mortal. Fate's chosen. I expect our paths will cross again." - Torvesard, wait!
Torvesard ignores you and teleports away.
Gold RoadEdit
Paths of ChaosEdit
If you have started the quest Paths of Chaos from Leramil the Wise, Elenglynn will be one of the locations she asks you to investigate. After you have bypassed the maze within the ruins, you will encounter a disorientated Ithelia who urges you to use the Echonir to manifest a memory of linked to the place.
You will see a memory of when Hermaeus Mora first confronted Ithelia about the danger she posed to reality:
- Hermaeus Mora: "You risk everything, Ithelia. You must forsake the Many Paths."
- Torvesard: "You seek to diminish my Prince. Why should she agree to such a demand?"
- Hermaeus Mora: "To preserve reality. Her willfullness threatens all of existence."
- Ithelia: "You let your fear control you and foresee an apocalypse that will never be. Depart, Mora!"
- <The memory ends and Ithelia disappears.>
- Leramil the Wise: "Ithelia disappeared as soon as the memory ended. Let us speak outside."
The Many PathsEdit
You will find out from Leramil that there is a tangle of fate within the Outcast Inn and as Leramil is unable to investigate she will ask you to do it in her stead. Once inside barrier, you witness various unusal things, which includes a mostly amnesiac Ithelia whose lack of control over her power is causing the problems. You decide to help her as it is the best chance of fixing things, and go about in making Sage's Dream for her, as she believes it will help her control her abilities.
But to find ingredients you will need to enter the Many Paths. While exploring the first alternate reality alongside Ithelia, you encounter alternates of Torversard, Shardmarshal Vargas and Ithelia:
- Torvesard: "The enemy approaches! They come to imprison my Prince."
- Ithelia: "No, Torvesard. They are … different. Approach, pathwalker, and speak with me."
- <Torversard and Shardmarshal Vargas will walk to the side.>
You can speak to the alternate Torvesard and Shardmarshal Vargas, who will comment on your presence and that of your reality's Ithelia in their own world:
- "I serve the Prince of the Many Paths, and so I abide by her will. But I cannot understand allowing you and that other Ithelia to remain here. Not now, when the end is so near.
Speak to her as she wishes and go. We have urgent business to attend to." - What's going on here?
- "Other Daedric Princes, led by Hermaeus Mora, approach, coming to imprison Ithelia. Despite my protests, she refuses to resist them.
After all the battles, I do not understand why she now chooses to just … surrender. It makes no sense!"
After you have spoken with the Alternate Ithelia, he will be intrigued by your conversation with his Prince:
- "I found your conversation with my Prince very interesting. A mortal walking the Many Paths? And in service of the Fatechanger? I must respect that.
I hope you find what you need to help your Ithelia. Maybe you'll succeed where I have failed."
In the third reality you visit, the shrine will be badly damaged by the battles between the Princes' forces and there will be crystalline structures growing everywhere. As you cross a hallway almost entirely engulfed in crystal, you will encounter the Torvesard of this reality who warns you to keep your Ithelia away:
- Torvesard: "No, you must not bring that reflection any closer! Speak with me and I shall explain."
Speak with him to see what is going on:
- "Your Ithelia, does she not sense it? The Ithelia of this path, my Prince, has lost herself. She has become the monster that Hermaeus Mora foresaw. If she cannot regain control, this reality is finished.
Why does a mortal walk beside an Ithelia?" - I need to make a Sage's Dream so my Ithelia can control her power.
- "Then, I hope you succeed where I have failed. I tried to get my Prince to calm down, but she lashed out at Mora's forces with her full fury. The more she fought, the more lost she became.
Perhaps there is still a chance for you. How can I help?" - The Lamp of Clarity led us to two ingredients. I think the final ingredient is here.
- "Why would…? Oh, I understand. Azura's Lamp wants to preserve your reality. By helping your Ithelia regain control, she can be safely imprisoned again.
The ingredient you need is close by. Lute berries. Hurry and take them before it is too late." - Thank you.
In the background, the alternate Ithelia rises to the air, surrounded by an aura of light. This prompts Torvesard to urge you to flee before this reality unravels:
- "Flee while you can, mortal. Save your own life. Just spare a thought for this doomed path if you survive. I suspect we will not last much longer.
I suggest you take the lute berries and run. Good luck." - What did you mean that your Ithelia has become the monster Hermaeus Mora foresaw?
- "Ithelia is the Fate-Changer, the Unweaver. She has power unlike any other Daedric Prince—the power to shift existence itself.
Mora long suspected that Ithelia was dangerous. But full of uncontrollable rage? Reality itself unravels around her." - What happens then?
- "The unimaginable. Can you contemplate what happens when reality shreds like parchment beneath a sabre cat's claws? Nothing remains when existence ceases to be."
You proceed to gather the lute berries and flee alongside your reality's Ithelia, as the alternate Ithelia's fury starts causing cracks in reality itself to appear around the chamber.
Relics of the Three PrincesEdit
After the events of Hoperoot, you will be travelling around West Weald to locate and recover Daedric artifacts that were used to imprison Ithelia. After you have found the Skein of Secrets within the long-lost vault of Niryastare, Beragon will point out an Echonir manifestation, indicating a memory is present.
Using the Echonir, it shows Hermaeus Mora warning Ithelia once more that he and the other Princes would take action if she continued to manipulate fate as she did:
- Torvesard: "Why do you trouble my Prince, Ur-Daedra?"
- Hermaeus Mora: "The Many Paths splinter. You manipulate fate in ways that were not meant to be!"
- Ithelia: "What I do I do [sic] for the good of all. Why can you not see that, Mora?"
- Hermaeus Mora: ""I am not alone in my concerns, Ithelia. Constrain yourself or we will constrain you."
- Ithelia: "And you will fail! Now begone!"
- <The memory ends and Beragon will want to talk to you.>
- Beragon: "A memory of Ithelia arguing with Hermaeus Mora! Have you ever seen such a thing? Friend, we should talk."
King Nantharion's GambitEdit
You efforts to track down King Nantharion and stop his plans leads you to the ruined city of Miscarcand found beneath Vashabar. While you and Tribune Alea Idolus race through the ruins to reach Ithelia and Nantharion, you come across an Echonir manifestation:
Once activated, it will two Daedric forces fighting each other:
- Torvesard: "Guard the door! They must not reach the well!"
- Tribune Alea Idolus: "The memory of a great battle? Who are Ithelia's forces fighting?"
- Tribune Alea Idolus: "Up there! It's Shardmarshal Vargas!"
- Shardmarshal Vargas: "Warriors of Mirrormoor, stand fast against Mora's minions!"
- <Suddenly the past version of Vargas is replaced with her present version.>
- Shardmarshal Vargas: "If this memory interests you so much, allow me to send you there!"
- <Golden threads of light surround you and you hear Tribune Alea's voice trail off.>
- Tribune Alea Idolus: "Comrade? Comrade where are you?"
You will then need to fight your way out of the memory to reunite with Tribune Alea. Later on when you reach the Deep Halls, you will find another Echonir manifestation. Using the Echonir, it will show Hermaeus Mora and his forces facing down a cornered Ithelia with Torvesard at her side, two crystal atronachs will be guarding a passage:
- Hermaeus Mora: "Why continue this futile struggle, Ithelia? Every fate before me says you cannot win."
- Ithelia: "But you do not see everything, Mora. In the Many Paths, all things are possible. I will write my own fate!"
- <A portal is opened.>
- Torvesard: "Go, my Prince! You must escape!"
- Hermaeus Mora: "Ithelia, wait!"
- <Ithelia goes through the portal and the vison ends.>
- Tribune Alea Idolus: "Is this where Ithelia lost her ancient battle? Hmm. Her minions remained to guard the passage behind her."
After this, you will find and defeat King Nantharion but Ithelia will regain much of her power and leaves for places unknown with Shardmarshall Vargas.
The Untraveled RoadEdit
After Miscarcand, the Skein of Secrets will lead you to Wendir and then to the ruins in an unknown part of Fargrave. After you are separated from Beragon and Tribune Alea by Shardmarshal Vargas, you and Leramil will reach a dead end with a archway and four mirrors in front of it. You will also see an Echonir manifestation nearby.
When you use the Echonir, it shows Torvesard and Shardmarshal Vargas:
- Shardmarshal Vargas: "Your wanderings are futile, Torvesard. What you seek is here. The Loom of the Untraveled Road. I have no idea what it is, but I am certain it is important."
- Torvesard: "You can stare at the sealed portal until you go mad, Vargas. I go in search of my missing memories."
- <The memory ends.>
- Leramil the Wise: "A memory of Torvesard and Vargas before they recovered what had been forgotten. Let us talk."
After entering the portal which leads to the Fargrave Loom Quarter and defeating some Shardborn, you come across another Echonir manifestation:
- Leramil the Wise: "Proxy, look. Another memory. Use the Echonir."
Using the Echonir, you will see a more recent memory of Ithelia explaining what the Loom of the Untraveled Road is to Torvesard and Shardmarshal Vargas:
- Ithelia: My Loom of the Untraveled Road fills this place. From its core, I can break the shackles of fate. Undo mistakes. Unlock possibilities. Create new histories."
- Leramil the Wise: "Ithelia can use the Loom to change history? That is how she will restore what was lost!"
- Shardmarshall Vargas: "It's magnificent! But won't some Princes see it as a threat?"
- Ithelia: A threat? This is a gift. The gift of unconstrained choice."
- Ithelia: The Loom will weave a new story for every being, what they choose to be true. All shall benefit!"
- Torvesard: A wonderful gift indeed, my Prince!"
- <The memory ends.>
- Leramil the Wise: "Ithelia and Vargas have reached the loom's core. We must reach them before they destroy the reality we know."
After you have escaped a trap set by Shardmarshal Vargas and rescued your companions, you can reach the Loom of the Untravelled Road. It is a shell of crystal surrounded by floating crystalline formations. The giant skeletons of Bearers are arranged in a circle all around it. Leramil describes it as a device of unimaginable power which is what Hermaeus Mora fears, and Beragon will sight Torvesard and Shardmarshal Vargas accompanying her.
As you fight through more Shardborn forces, you can hear a conversation between Ithelia and her lieutenants, where she explains what she is trying to do:
- Ithelia: "Now I can undo my long imprisonment. Make it so I was never forgotten."
- Ithelia: "I can find a path in which the Princes and I were never in conflict. And with the Loom I shall weave it into this reality!"
- Torvesard: The Loom awaits my Prince. Reshape the fates and restore the glory of Mirrormoor!"
- Shardmarshal Vargas: "Mirrormoor stands ready, my Prince. Weave a better reality with your Loom!"
- Leramil the Wise: "Ithelia has not yet activated the Loom. We can still intervene!"
You reach the core of the Loom, Ithelia is floating above, connected to it and pulling in power, while Torvesard will be assisting with the process. Shardmarshal Vargas will lead the defence and is at first heavily shielded. During the fight, your allies will assist you and Ithelia will ask you why you are fighting when she is using the Loom for your sake. Midway through the fight, Ithelia will allow Vargas to draw power from the Loom and it transforms her into a Shattered Shard. At the point that Shardmarshal Vargas is defeated, Ithelia will be devastated and Leramil will order you to destroy the Loom with Abolisher.
You use Abolisher to destroy the central sigil of the Loom. The floating crystals shatter, followed by the crystalline formation surrounding Ithelia exploding in a burst of energy:
- Ithelia "Arggh! My Loom! But the power! Such terrible power!"
- <The light surrounding Ithelia becomes brighter and turns crimson.>
- Torvesard: The Loom is destroyed, my Prince! We must leave this place!"
- Ithelia "I am the Last Tomorrow, the Unweaver! I am filled with the power of the Many Paths! Come, Torvesard, away!"
- <Ithelia and Torvesard disappear.>
- Beragon: "You did it, friend! But what's happening to Ithelia?"
- Tribune Alea Idolus: "Ithelia has become … something else."
- Leramil the Wise: "Abolisher is depleted, but it did its job. The Loom has been destroyed. I shall open an exit. Let us leave this place."
- <Leramil opens a portal to Skingrad.>
Secrets of Apocrypha EpilogueEdit
Ithelia's FuryEdit
After you have completed both of the Shadow Over Morrowind and Recollection of Ithelia story lines, you will have unlocked the epilogue. This starts with a panicked Scruut contacting you and saying that instabilities in reality have been detected and it is due to Ithelia's actions. If nothing is done, then reality will come apart at the seams.
You will be asked to investigate the reality tears and later travel to certain locations around Tamriel to restore the three relics power, in preparation for the battle to come.After restoring the last of the depleted artifacts of the three Princes, Torvesard will appear out of a portal:
- Torvesard: Lower your weapons, I only want to talk."
When you speak with Torvesard, he will make it clear he is giving you one last chance to stay out of the way:
- "I see you are still at the beck and call of the lying Prince of Fate. I do not seek to be your enemy, mortal. Before we irreversibly cross a threshold from which there is no return, I would reach an understanding between us."
- Reality is in danger, Torvesard. Your Prince is creating tears in the fabric of existence.
- "Existence? You speak of it as though it were sacrosanct. But my Prince was locked away and erased from existence by your smug and sanctimonious patron. Forgotten by all. I fixed that, but when we tried to restore our realm, our home, you opposed us."
- You and Ithelia were going to change history!
- "No different from what Mora and the other Princes did in that distant millennium. Think of what could have been accomplished had not the Prince of Paths been vanquished from history!
Do you not see? Just stand aside and let events flow as they may." - I can't let Ithelia destroy reality.
- "As I feared. Hermaeus Mora sees so much but has blinded you. I respect you, mortal. Do what you must and I shall do the same.
Perhaps when reality has been rewritten and a new Mirrormoor arises, you will have a different opinion."
Torvesard makes once last comment before he leaves:
- Torvesard: Consider what I have said. We Daedra may be immutable, but you mortals are not."
- <Torvesard opens a portal and disappears>
Once you have confirmed that the cracks in reality that are forming due to Ithelia's influence on fate, and restoring the depleted relics, you return to Fargrave and to the Loom of the Untraveled Road with Leramil and Curate Gadayn. Att the foot of the destroyed loom, you will be able to use the Echonir.
Using the Echonir, it shows Torversard and Ithelia while the latter examines the damage to the Loom:
- Torvesard: "Is nothing salvageable, my Prince?"
- Ithelia: "Nothing, damn them!"
- Ithelia: "Very well. If I cannot restore Mirrormoor, I will create a new realm—upon the festering corpse of Apocrypha!"
- <The memory ends.>
- Leramil the Wise "Apocrypha! Proxy, we must talk!"
After this you will argue with both Leramil and Scruut about the ability of Daedra and by extension Ithelia to change. You eventually get them to agree to using the concept of Ithelia's alternates from the Many Paths to create a relic that would allow Ithelia to see what is happening to her. You are sent to Ceyond with your companions to recover a fragment of the Primordial Shattered Titan to use as the base of the relic.
During your time there, you will see many reality tears and after you slay the Shattered Titan, the amount will increase rapidly and will be tearing the place apart. Once you pick up the large crystal fragment, something unexpected will happen:
- Tribune Alea Idolus: "What's happen—"
- <Torvesard will appear out of hiding nearby.>
- Torvesard: "I warned you against interfering, mortal, but you refused to heed me."
- <A reality tear appears in the air nearby.>
- Torvesard: "A reality tear? How fortuitous. Let this be the end of fate's chosen!"
- <Torvesard grips the tear with a stream of magic and attempts to move it on top of you. Your vision will be filled with black cracks and become monochrome.>
- <Gadayn leaps between you and the reality tear.>
- Curate Gadayn: "Friend, look out! Agghh!"
- <Curate Gadayn is sucked into the reality tear and Torvesard leaves through a portal.>
- Beragon: "Curate Gadayn! He's … gone."
- Tribune Alea Idolus: "Mourn later. We must get this fragment back to the others."
After this you return to Skingrad to inform Leramil what happened and work with her to create the Mirror of Truth.
Fate of the Forgotten PrinceEdit
With the creation of the Mirror of Truth, it is time to put the plan for stopping Ithelia into action. But you will need to find Ithelia quickly as reality is beginning crack and break. When you enter Apocrypha, you and Leramil will use the Skein of Secrets, and enter the Orphic Tunnels to find a secret entrance to the Mythos, Hermaeus Mora will call to you for assistance as you reach the portal. Once in the Mythos, you will find Ithelia's forces doing battle, and the surroundings changing to reflect Ithelia's realm. You will have to use the Lamp, Abolisher and the Skein at various points to get through the maze and reach Mora's Sanctum.
The final obstacle is when you reach the Sanctum entrance. You will see it is sealed by a Mirrormoor gate and is insultingly flanked by statues of Ithelia.
Using the Echonir, it will show Ithelia and Torvesard as they stand in front of the door:
- <Ithelia turn to Torvesard.>
- Ithelia: "Mora hides in his sanctum? I will transform this realm and make it his tomb! Set wards in place, my scion. Fate's minions must not be allowed to interfere."
- Torvesard "Yes, my Prince. None shall find the wards."
- <The vision ends.>
- Leramil the Wise: "We must locate those hidden wards, proxy. Perhaps the Skein of Secrets can serve us here."
When you enter the Sanctum, at the far end of the space, you will see Hermaeus Mora is suspended above a structure resembling the one that serves as the entrance to Ithelia's prison, Ithelia and Torvesard stand on either side of him, draining his power, Torvesard wielding the Staff of Many Paths to do so. Approaching them, you will hear their conversation:
- Hermaeus Mora: "You have become the very threat I foresaw, Ithelia."
- Ithelia: "Only a threat to you, Mora!"
- Hermaeus Mora: "Can you not see? Reality collapses around you as fate's threads unravel."
- Ithelia: "Your reality, fate-seer, not mine. Witness the ascension of the Prince of Paths to her rightful place of power!""
- <Ithelia notices you and teleports down to meet you.>
- Ithelia: "Keep draining Mora, scion. I will deal with his champions!"
- Torvesard: "With pleasure, my Prince."
- Leramil the Wise: "Stop Ithelia, proxy!"
During the fight, Ithelia will fly around and summon her forces via portals. You will have to stay alive long enough to wear Ithelia down and get the opportunity to use the Mirror of Truth. A golden beam of light will emerge from it and what Ithelia sees stuns her and makes her recoil. The red glow around her body will disappear, and she will want you to explain what just happened.
When you talk to her, she explains that the moment of clarity provided by the Mirror helped her remember that at the moment of her imprisonment she also foresaw the threat she would become to reality. But it was already too late to stop, as she had already implanted the compulsion in Torvesard to seek his lost memories and by extension release her.
Due to the power absorbed from the Loom and Hermaeus Mora, a destructive madness has its grip on her and the Mirror only provided a brief respite. Due to this, Ithelia offers Hermaeus Mora's stolen power back to him, only for an intervention to occur:
- Ithelia: "Hermaeus Mora, you were right. I am a danger to fate and reality. Let me return what is rightfully yours."
- <Ithelia raises her hands and Mora's power rises into the air and takes the form of a giant glass orb>
- Torvesard: "You are surrendering? Abandoning our sacred quest?"
- Torvesard: "No! We are too close! I claim the power! I will finish this!"
- <Torvesard uses the Staff of Many Paths to absorb both Hermaeus Mora' and Ithelia's power into himself. Ithelia will be pulled into a glass orb to keep her out of the way.>
- Ithelia: "Mortal, my scion has taken the power. You must stop Torvesard!"
- Leramil the Wise: "I shall aid Hermaeus Mora while you try to stop Torvesard."
| This article could benefit from an image. See Help:Images for information on how to upload images. Please remove this template from the page when finished. |
| Torvesard (lore page) |
|||
|---|---|---|---|
| Location | Hermaeus Mora's Sanctum | ||
| Race | Dremora | Gender | Male |
| Reaction | Hostile | ||
| Other Information | |||
| Faction(s) | Shardborn | ||
It is now time to fight Torvesard who wields the Staff of Many Paths, along with the power taken from both Hermaeus Mora and Ithelia.
- Torvesard: "Despite it all, it seems we are fated to battle. Face me, mortal!"
After first phase, Torvesard will call upon multiple versions of himself who wield different weapons:
- Torvesard: "You hold your own against me, now face a multitude!"
- <Multiple copies are summoned nearby.>
In response, Leramil will begin summoning your allies to assist you with the different platforms. At this point, Torvesard will shout the following things at you at different points:
- Torvesard: "You try my patience, mortal."
- Torvesard: "I never sought this battle, but you leave me no choice."
- Torvesard: "You agitate me to no end, mortal!"
- Torvesard: "I will restore the glory of Mirrormoor!"
After fighting him and his copies on the floating platforms, you and your companions will return to the main platform. Torvesard will summon various Mirrormoor creatures, and soon he will have had enough:
- Torvesard: "Enough! Witness the combined power of the Fate-Changer and the Master of Fate!"
- <Torvesard holds the staff above his head and becomes much bigger.>
At this point he will be mostly invunerable, but Leramil will point out when he is vunerable to attacks.

When Torvesard has been defeated, he will rise in the air and vanish in a burst of golden light. Ithelia, now freed, floats down to the platform:
- Ithelia: "I created my scions to save me from a fate I finally accepted, though I had forgotten until you reminded me."
- <Torvesard's transluscent Vestige appears and bows before her.>
- Torvesard: "No, my Prince! I am Dremora! I am eternal! I will reform and complete the task you set before me."
- Ithelia: "Such is the nature of Daedra. Never changing. Never growing. I return your power to you, Mora! And I disperse mine into the Void!"
- <Golden light gathers in her palms and disappears. She then gently places her hand on Torvesard's head.>
- Ithelia: "And Torvesard, my most faithful. I consign your essence to nothingness, never to return. Be at peace at last."
- <White flame emerges from her hand and Torvesard's Vestige disappears in gold sparks.>
- Ithelia: "Poor Torvesard. Blinded by a compulsion I never should have bestowed."
At this point Hermaeus Mora, now freed and with his power restored, will intervene, opening a portal to Ithelia's prison and telling her it is time for Ithelia to return. You will then enter the portal to witness Ithelia's fate.
GalleryEdit
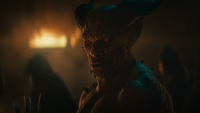
Torvesard in the cinematic trailer for the Necrom chapter

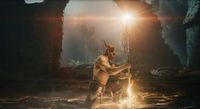
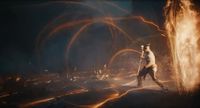
Torvesard wrests a staff from the nameless heroes in the cinematic trailer for the Gold Road chapter
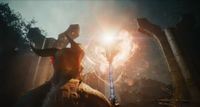
Torvesard summons Ithelia in the Gold Road cinematic trailer
Torvesard summons Ithelia
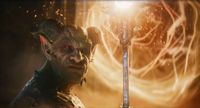
Torvesard is made aware of the three heroes' intrusion
The summoning is interrupted

Artwork featuring Torvesard holding the Staff of Many Paths (left)


NotesEdit
- His appearance and abilities share many characteristics with Morphoid Daedra.
- Torvesard's Journal can be found near where you last meet him after completing Necrom's storyline.
- He wears the Shattered Mirror Maze Body Marks.